> ## Documentation Index
> Fetch the complete documentation index at: https://docs.ones1ght.com/llms.txt
> Use this file to discover all available pages before exploring further.
# 7. Verification
> Use the demo app to confirm that the positioning infrastructure you installed actually works. Covers what to check at each step and what to do when a check fails.
**Where you work —** 🏬 on site + 📱 verification app (with one 🖥️ OneS1ght console check in between)
Once you reach this point the infrastructure build is done. Now it is time to confirm that it **actually works**.
**Why this step is needed**
The anchor hardware itself only tells you **whether it has power**.
Whether the coordinates were entered correctly and whether the cluster was assembled properly can only be confirmed by **running real positioning with the app**.
## Before you start
All of the following must be complete. If even one is missing, no position is produced.
| Item to confirm | Document |
| -------------------------------------------------------------- | ------------------------------------------------------------- |
| Floor plan uploaded · scale set | [3. Build Spaces](/en/geospace/spaces) |
| 4 anchors installed · powered | [Anchor installation](/en/geospace/install) |
| Coordinates entered on the floor plan · `[Apply devices]` done | [Floor plan placement](/en/geospace/placement) |
| Partner key issued · registered in the console | [Positioning connection · key issuance](/en/geospace/connect) |
**What you need**
* An iPhone with UWB support (iPhone 12 or later · iOS 27.0 or later)
* The **verification app (demo app) and install instructions** handed to you by your contact
**No code is needed for verification.** You **download the verification app (demo app)** and check with it, just like installing any other app.
Your contact provides the app and the install instructions — if you have not received them, request them at `onesight-support@onecheck.co.kr`.
## Check 1 · Anchor power
On site, visually confirm that **all 4** anchors you installed have power.
Look at the LED window on the front of the anchor. Check all 4.
| LED | Verdict |
| -------------------------------------- | ------------------------------------------------------------------------------------------------ |
| **On** (yellow, green, blinking, etc.) | Normal |
| **Red on** | You can continue, but it needs a look → [Troubleshooting](/en/troubleshooting#anchor-led-is-red) |
| **Off** | No power — check the cable and power strip (this one is a real blocker) |
Confirm that any wiring running across the floor is taped down.
If someone trips and pulls a cable loose, that one anchor goes quietly dead.
**Check point —** all 4 anchors have their LED **on** (yellow, green or blinking are all fine).
If even one is off, do not move to the next step. Positioning is unstable with 3 or fewer anchors.
## Check 2 · Console connection status
Confirm that the OneS1ght console is pulling the real floor plan from GeoSpace.
In the OneS1ght console, go to **Settings → Geospace integration** card (a badge is shown on the right of the card, and clicking **\[Mobile positioning settings]** opens the details).
Check the badge shown on the screen.
| Badge | Meaning | What to do |
| ----------------------------------- | ------------------------------------------------------------ | ----------------------------------------------------------------- |
| **Connected** | The partner key is registered and the integration is working | Move to the next step |
| **Not connected** (simulation mode) | There is no partner key | Register one in [6. Positioning connection](/en/geospace/connect) |
Clicking **\[Mobile positioning settings]** next to the badge shows the registration date and the last verification time.
Go to **Space management** and confirm that the floor plan shown is the **actual floor plan** you uploaded to GeoSpace.
If you see an unfamiliar sample floor plan, you are still in simulation mode.
**Check point —** the badge reads **Connected**, and Space management shows the floor plan you uploaded.
## Check 3 · Run the verification app
Run it **inside the site where the anchors are installed**. No position is produced outside the detection area.
**Allow** the location permission and the nearby-device access permission. If you deny them, UWB positioning does not start.
**Select the building and floor** at the top of the app and the site floor plan is displayed.
(Text in the verification app may be shown in Japanese — 「現在地を確認」= check current location)
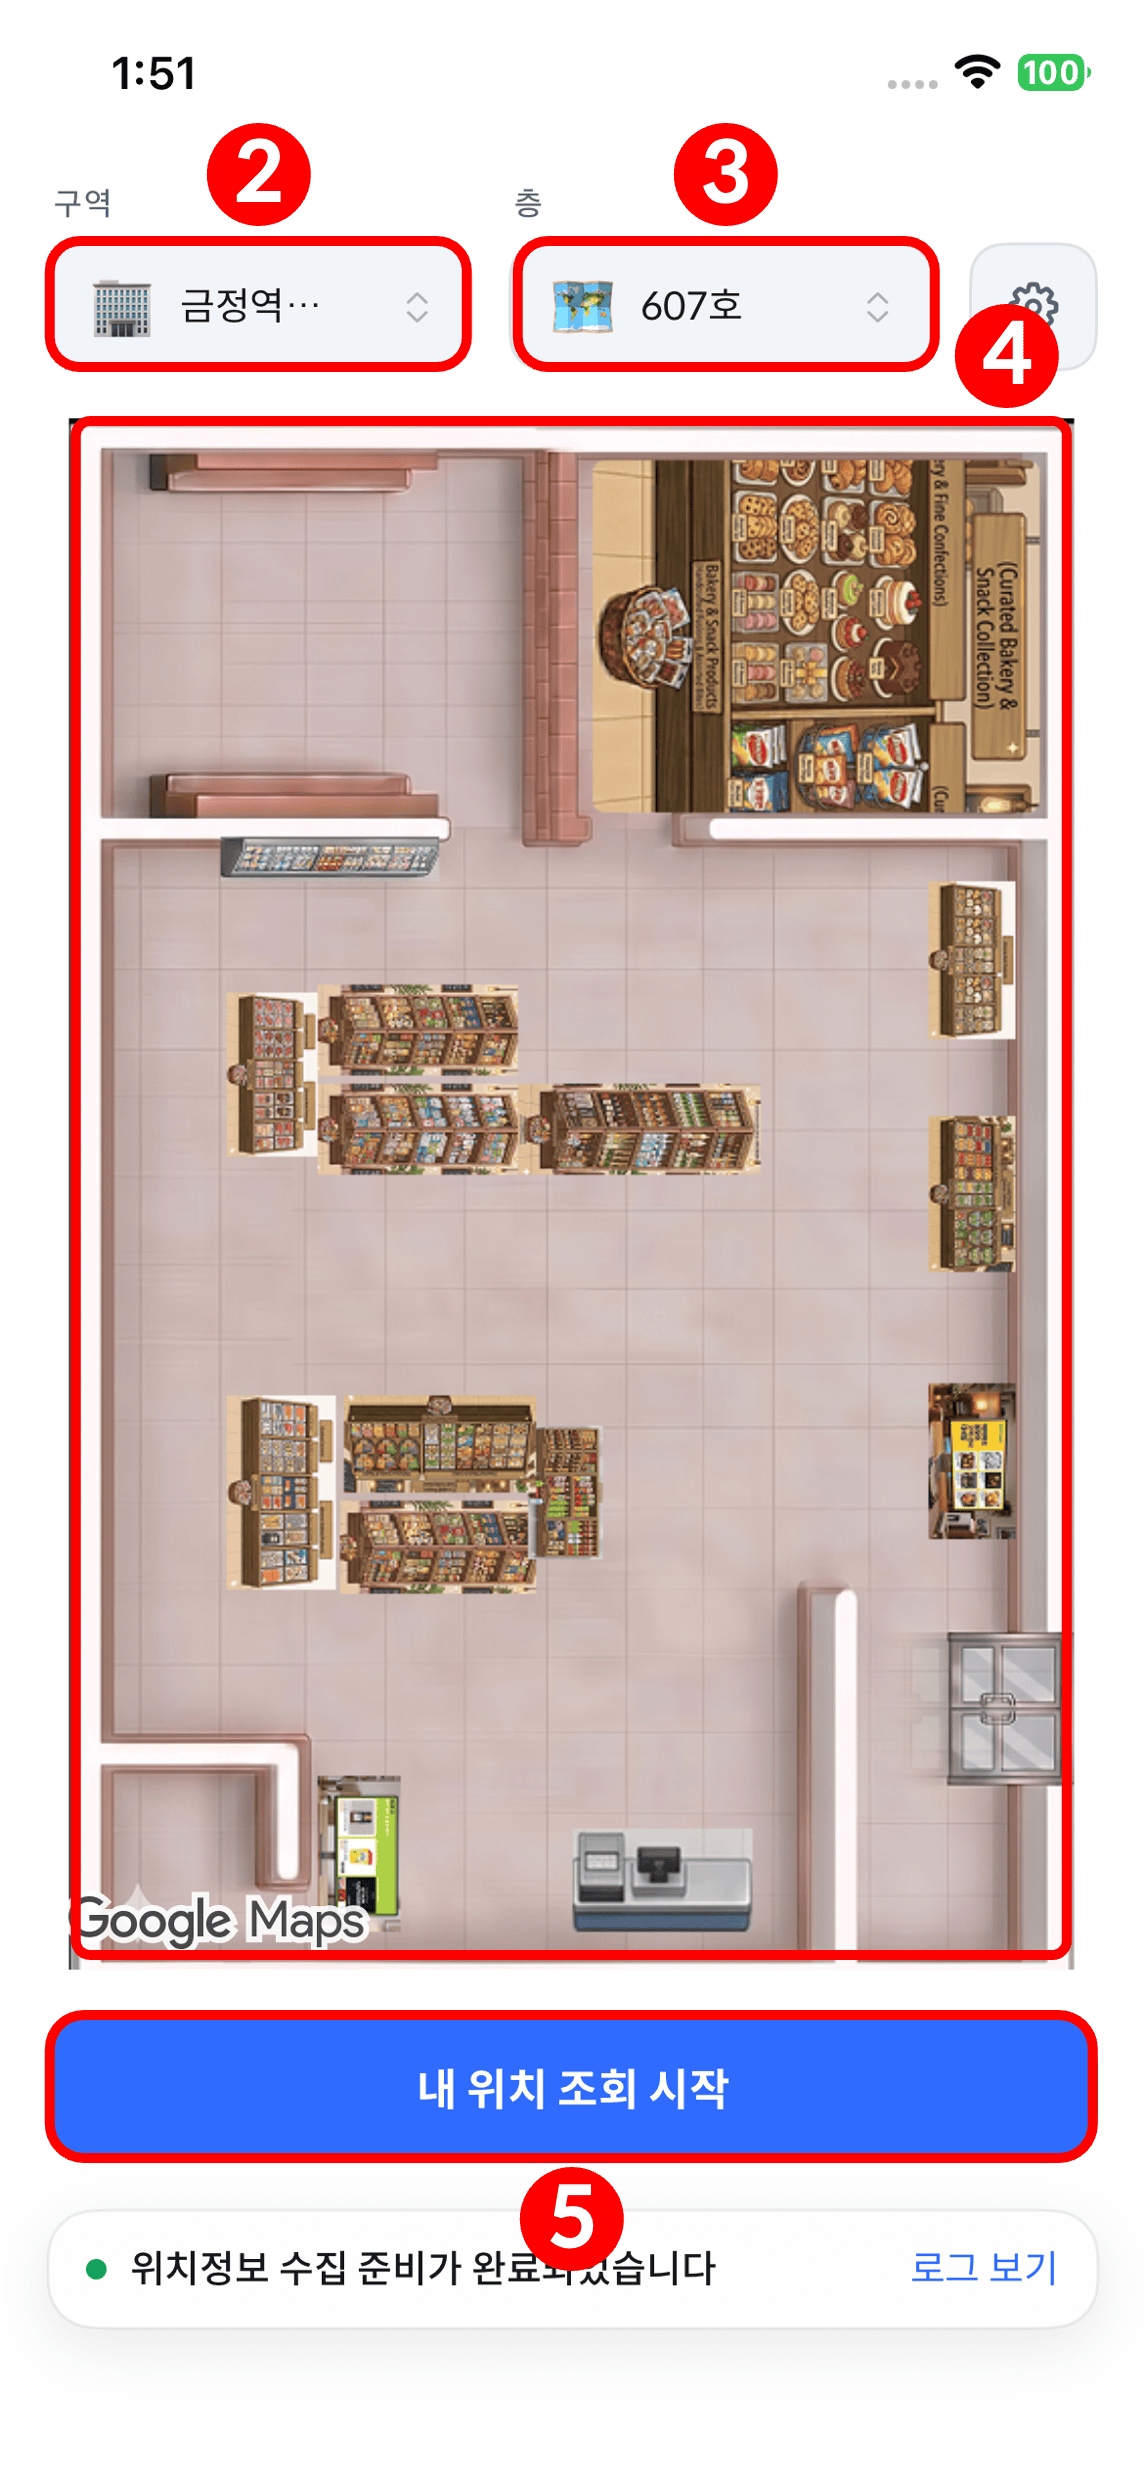 **Check point —** the site floor plan is displayed in the app.
If no floor plan appears → [Troubleshooting · No floor plan appears in the app](/en/troubleshooting#no-floor-plan-appears-in-the-app)
## Check 4 · Real position
This is the most important step. **Walk around yourself** and confirm the dot follows you.
Stand at the **center** of the rectangle formed by the 4 anchors and look at the app screen.
A dot must appear on the floor plan.
Walk **slowly** from one end to the other.
Watch whether the dot on screen follows your movement.
**Check point —** the site floor plan is displayed in the app.
If no floor plan appears → [Troubleshooting · No floor plan appears in the app](/en/troubleshooting#no-floor-plan-appears-in-the-app)
## Check 4 · Real position
This is the most important step. **Walk around yourself** and confirm the dot follows you.
Stand at the **center** of the rectangle formed by the 4 anchors and look at the app screen.
A dot must appear on the floor plan.
Walk **slowly** from one end to the other.
Watch whether the dot on screen follows your movement.
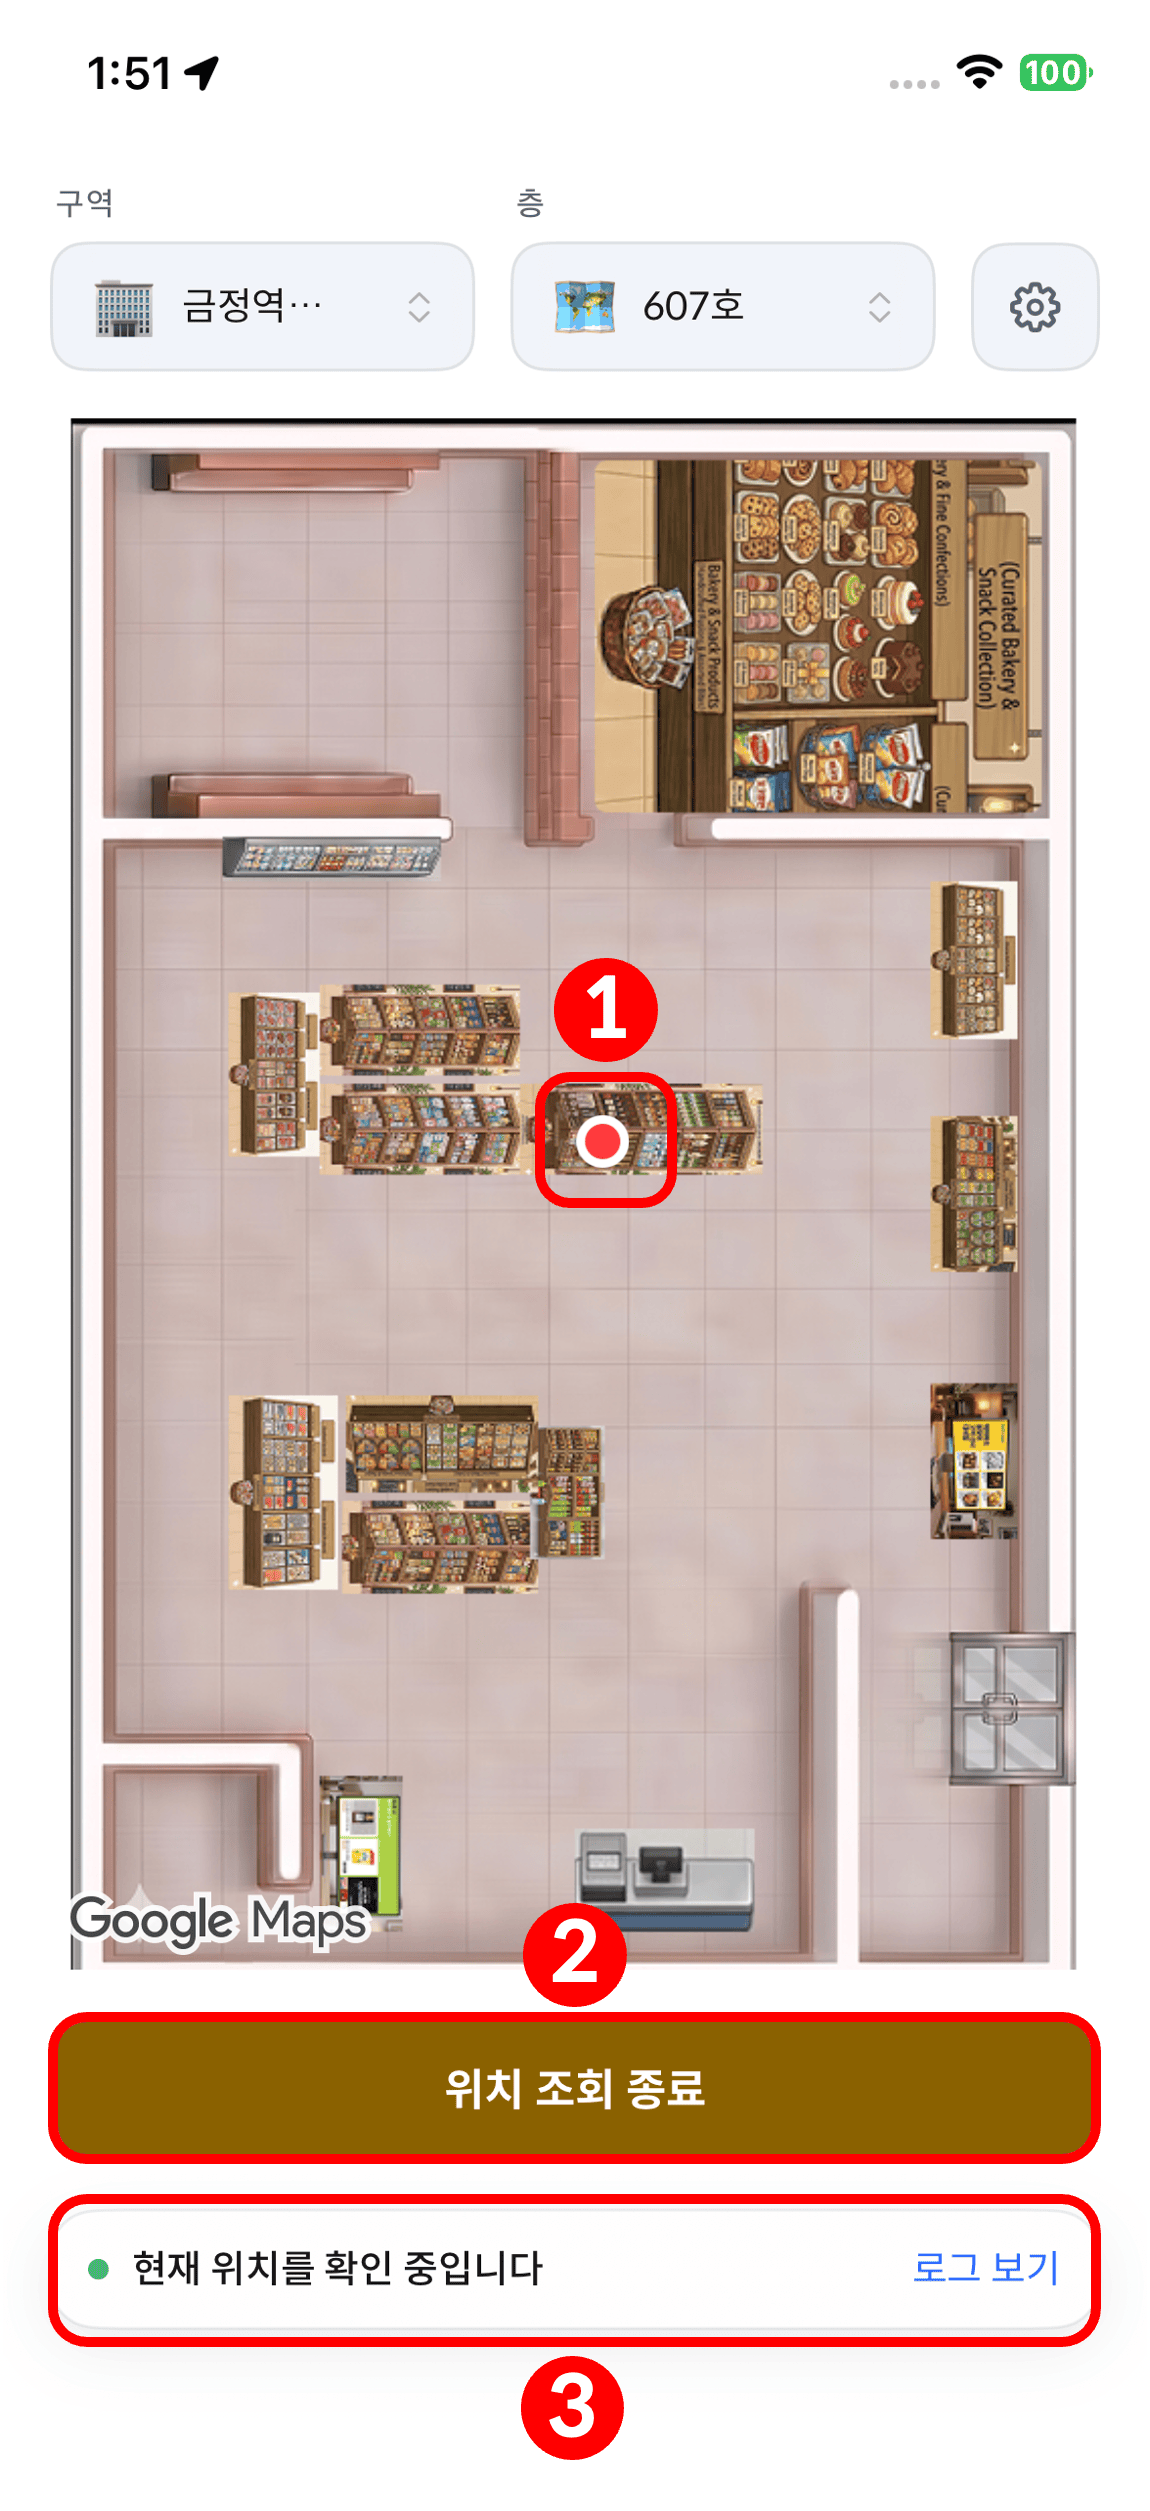 Stand under each anchor and confirm that the dot on screen is at **that same corner on the floor plan**.
This is the surest way to verify that the coordinates were entered correctly.
The floor plan in the app **may appear rotated** compared with the GeoSpace screen — use the entrance position to line up the orientation.
While you stand still, the dot **wobbling by a few tens of cm is normal**; landing on the wrong corner or jumping several meters is the warning sign.
**Check point —** all three must hold.
1. The dot **appears** on screen
2. The dot **follows** you when you walk
3. At each of the four corners, the dot is at **the same corner on the floor plan**
If any one fails, find your symptom in the table below.
## When a check fails
| Symptom | Most common cause | Go to |
| ----------------------------------------- | ----------------------------------------------- | ------------------------------------------------------------------------------------- |
| No dot appears at all | Cluster not applied, device without UWB support | [Troubleshooting](/en/troubleshooting#no-position-dot-appears-in-the-app) |
| The dot is in the wrong place | Floor plan image offset not applied | [Troubleshooting](/en/troubleshooting#position-is-shown-somewhere-other-than-reality) |
| The dot jitters badly | Metal interference, anchors mounted too low | [Troubleshooting](/en/troubleshooting#position-jitters-or-jumps-badly) |
| Distance travelled does not match reality | Floor plan scale error | [Troubleshooting](/en/troubleshooting#distance-travelled-does-not-match-reality) |
## Verification complete
If all four checks passed, **the positioning infrastructure build is finished.** There is nothing left to do on site.
What comes next depends on your role — either [draw zones](/en/locator/areas) in the console to receive enter / exit / dwell events, or
[integrate the SDK](/en/sdk/overview) into the customer app. Both are separate from the infrastructure build.
Stand under each anchor and confirm that the dot on screen is at **that same corner on the floor plan**.
This is the surest way to verify that the coordinates were entered correctly.
The floor plan in the app **may appear rotated** compared with the GeoSpace screen — use the entrance position to line up the orientation.
While you stand still, the dot **wobbling by a few tens of cm is normal**; landing on the wrong corner or jumping several meters is the warning sign.
**Check point —** all three must hold.
1. The dot **appears** on screen
2. The dot **follows** you when you walk
3. At each of the four corners, the dot is at **the same corner on the floor plan**
If any one fails, find your symptom in the table below.
## When a check fails
| Symptom | Most common cause | Go to |
| ----------------------------------------- | ----------------------------------------------- | ------------------------------------------------------------------------------------- |
| No dot appears at all | Cluster not applied, device without UWB support | [Troubleshooting](/en/troubleshooting#no-position-dot-appears-in-the-app) |
| The dot is in the wrong place | Floor plan image offset not applied | [Troubleshooting](/en/troubleshooting#position-is-shown-somewhere-other-than-reality) |
| The dot jitters badly | Metal interference, anchors mounted too low | [Troubleshooting](/en/troubleshooting#position-jitters-or-jumps-badly) |
| Distance travelled does not match reality | Floor plan scale error | [Troubleshooting](/en/troubleshooting#distance-travelled-does-not-match-reality) |
## Verification complete
If all four checks passed, **the positioning infrastructure build is finished.** There is nothing left to do on site.
What comes next depends on your role — either [draw zones](/en/locator/areas) in the console to receive enter / exit / dwell events, or
[integrate the SDK](/en/sdk/overview) into the customer app. Both are separate from the infrastructure build.