> ## Documentation Index
> Fetch the complete documentation index at: https://docs.ones1ght.com/llms.txt
> Use this file to discover all available pages before exploring further.
# Verification
> After OneS1ght Support notifies you of 'Deployment Complete', confirm positioning works with the verification app and create zones in Space Management.
## 1) Before You Start
Verification requires an iPhone with UWB support.
* Device: iPhone 12 or later (with a UWB chip)
* iOS: 27.0 or later
iPhone 11 and earlier have no UWB chip, so positioning will not work.
Proceed **after OneS1ght Support notifies you of 'Deployment Complete'**. Space registration, locator placement and cluster apply, and OneS1ght integration have already been completed by OneS1ght Support.
No code entry is needed during verification. Install the verification app (demo app)
the same way as any regular app and check that positioning works.
The verification app and installation guide are provided by your contact. If you have not received them,
request them at [onesight-support@onecheck.co.kr](mailto:onesight-support@onecheck.co.kr).
## 2) Checking Locator Power
Confirm all 4 installed locators show a green top LED and a blue bottom LED (server connected).
If any locator is not lit, check its power connection.
Locators whose cluster is already 'Deployment Complete' keep positioning even if Wi-Fi drops and the bottom LED blinks purple and light blue
([Troubleshooting](/en/troubleshooting#locator-bottom-led-blinks-purple-and-light-blue)).
(For LED positions and color meanings, see the LED tables in [4. On-Site Locator Installation](/en/geospace/install).)
* Do not proceed to the next step if even one locator is powered off.
* Stable positioning requires at least 4 locators working properly.
## 3) Running the Verification App
**(1) Install the app**
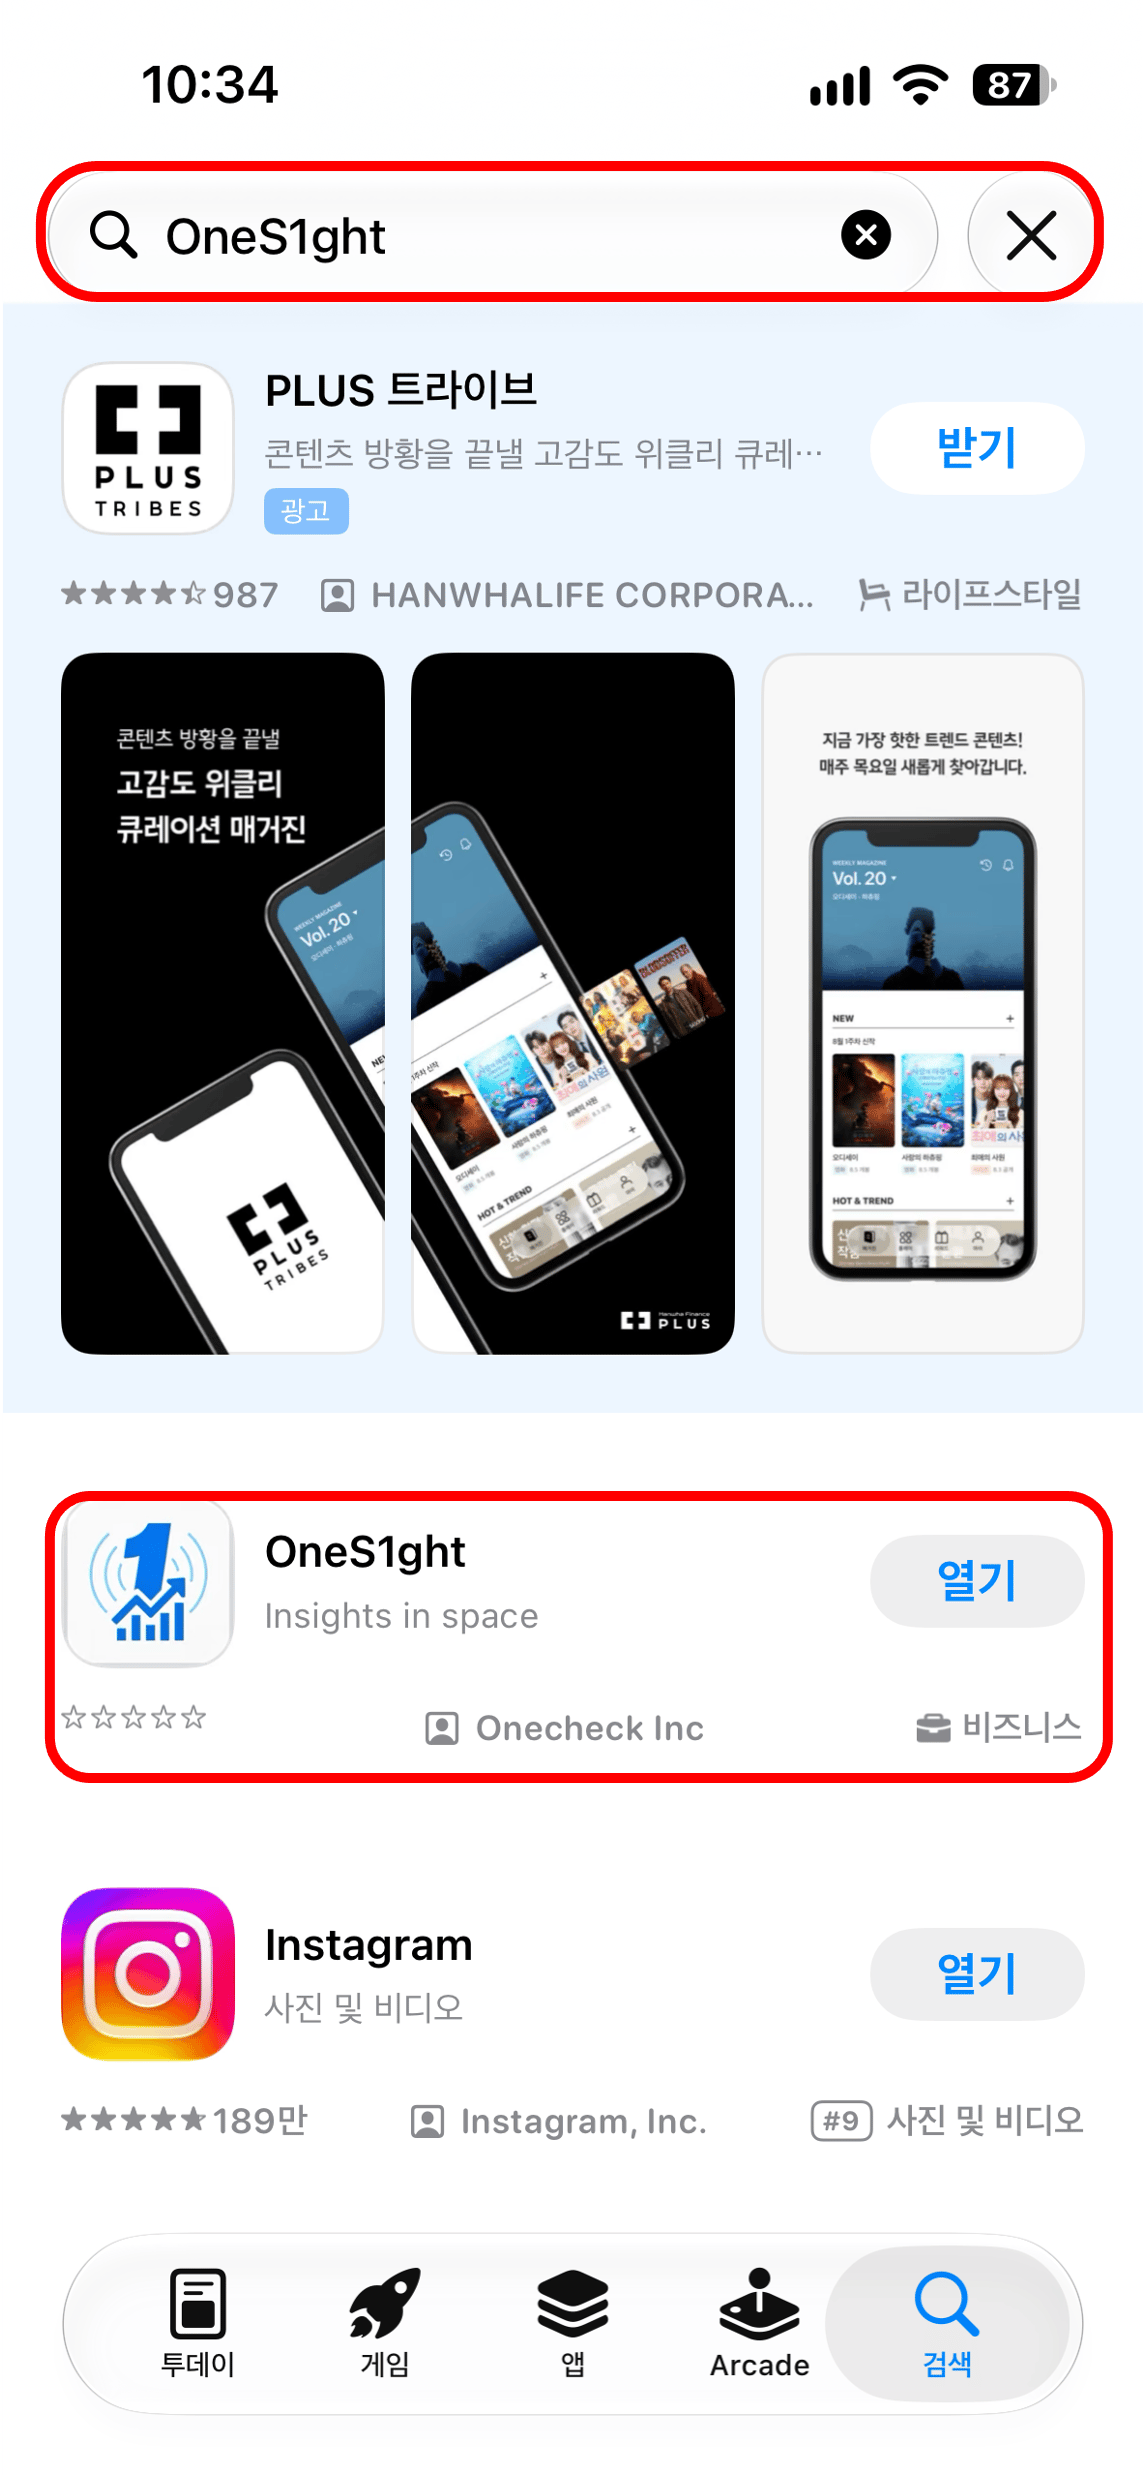 Search for 'OneS1ght' in the App Store and install it.
* Confirm it is the OneS1ght app published by Onecheck Inc before installing.
* Once installed, open the OneS1ght app.
**(2) Grant permissions**
The first launch shows permission requests. All the permissions below must be allowed for positioning to work.
| Permission | Purpose |
| - | - |
| Location | ·Used to show your position on the map |
| Bluetooth | ·Used to receive signals from the UWB locators |
**(3) Log in**
Search for 'OneS1ght' in the App Store and install it.
* Confirm it is the OneS1ght app published by Onecheck Inc before installing.
* Once installed, open the OneS1ght app.
**(2) Grant permissions**
The first launch shows permission requests. All the permissions below must be allowed for positioning to work.
| Permission | Purpose |
| - | - |
| Location | ·Used to show your position on the map |
| Bluetooth | ·Used to receive signals from the UWB locators |
**(3) Log in**
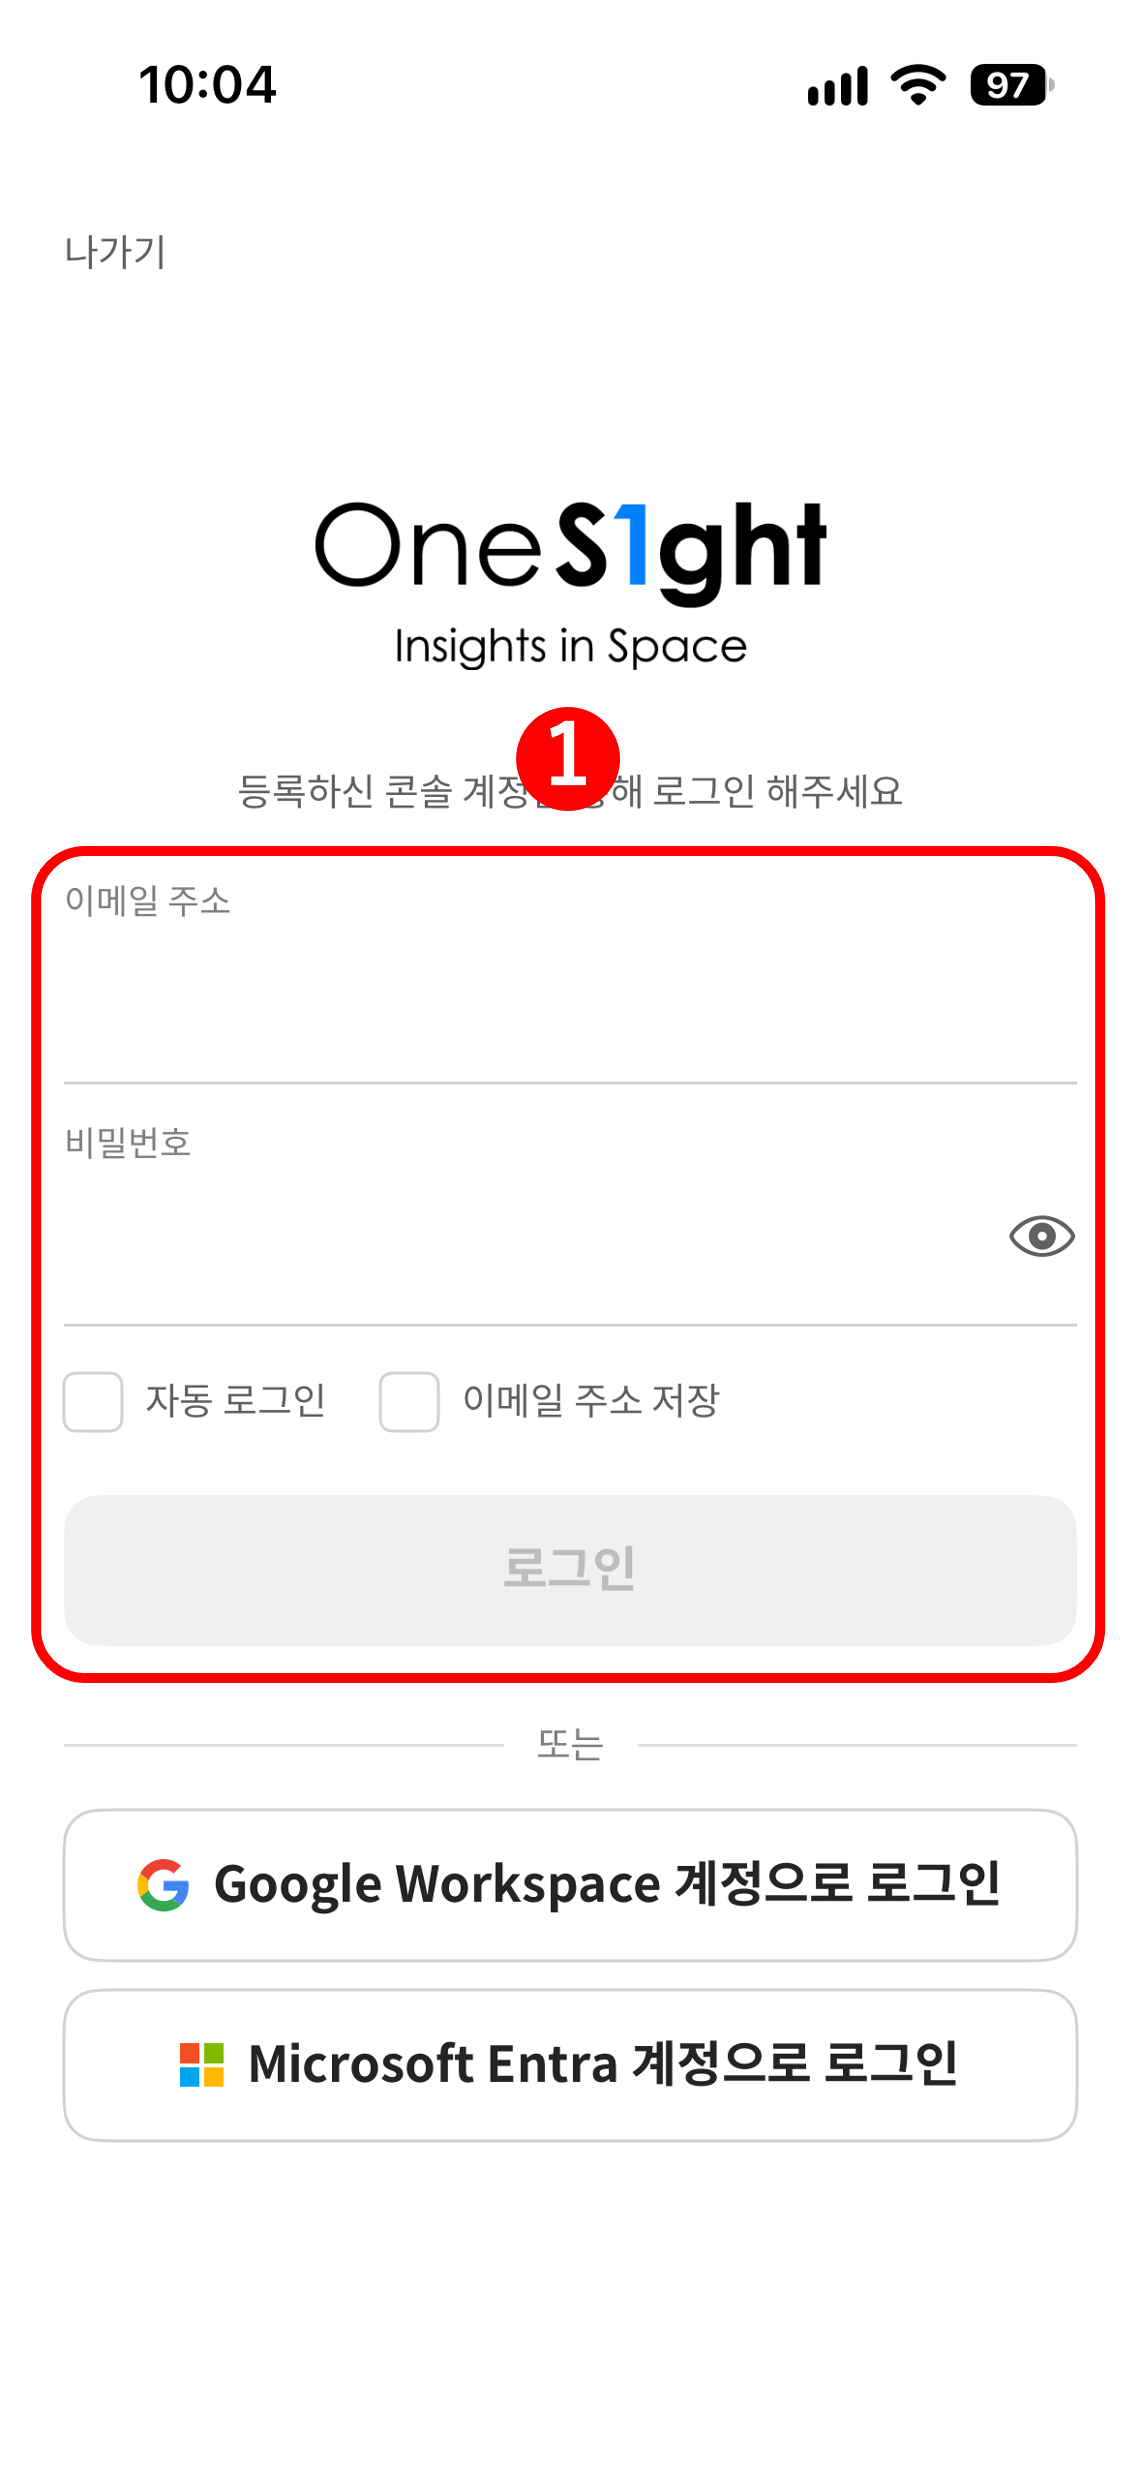 When the login screen appears, log in with the email and password registered in OneS1ght.
If your email is not registered you cannot log in; ask an organization administrator (owner or manager) to invite you.
* Always run the app inside the positioning area where the locators are installed.
Positioning may not work properly outside the detection area.
**(4) Positioning screen**
When the app detects nearby locator signals over Bluetooth, it automatically recognizes the GeoSpace
building and floor those locators are registered to, and positioning starts. No manual building or floor selection is needed.
**Before locators are detected (Looking for locators)**
When the login screen appears, log in with the email and password registered in OneS1ght.
If your email is not registered you cannot log in; ask an organization administrator (owner or manager) to invite you.
* Always run the app inside the positioning area where the locators are installed.
Positioning may not work properly outside the detection area.
**(4) Positioning screen**
When the app detects nearby locator signals over Bluetooth, it automatically recognizes the GeoSpace
building and floor those locators are registered to, and positioning starts. No manual building or floor selection is needed.
**Before locators are detected (Looking for locators)**
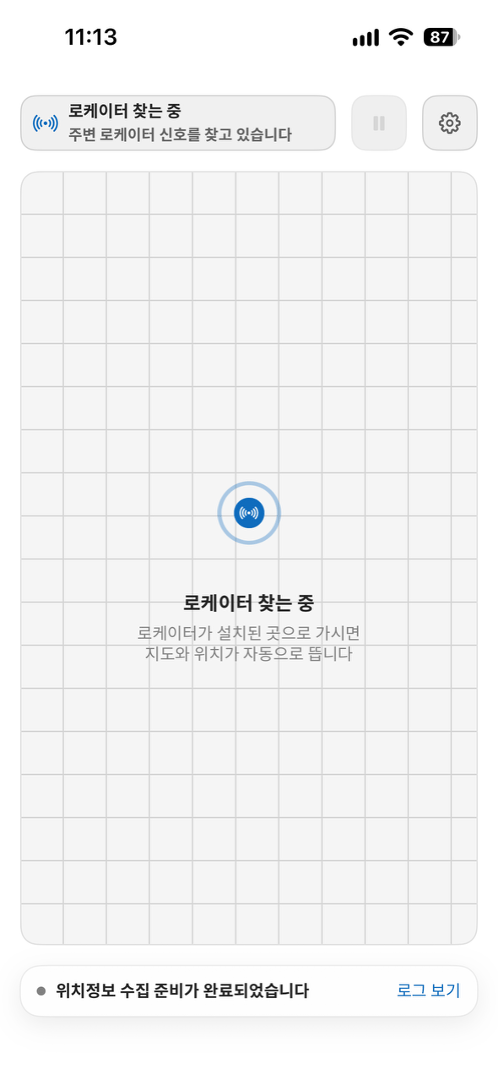 * Right after login, the 'Looking for locators' screen stays up while no locators are detected.
* Moving into the detection area where the locators are installed proceeds automatically.
**After locators are detected (positioning starts)**
* Right after login, the 'Looking for locators' screen stays up while no locators are detected.
* Moving into the detection area where the locators are installed proceeds automatically.
**After locators are detected (positioning starts)**
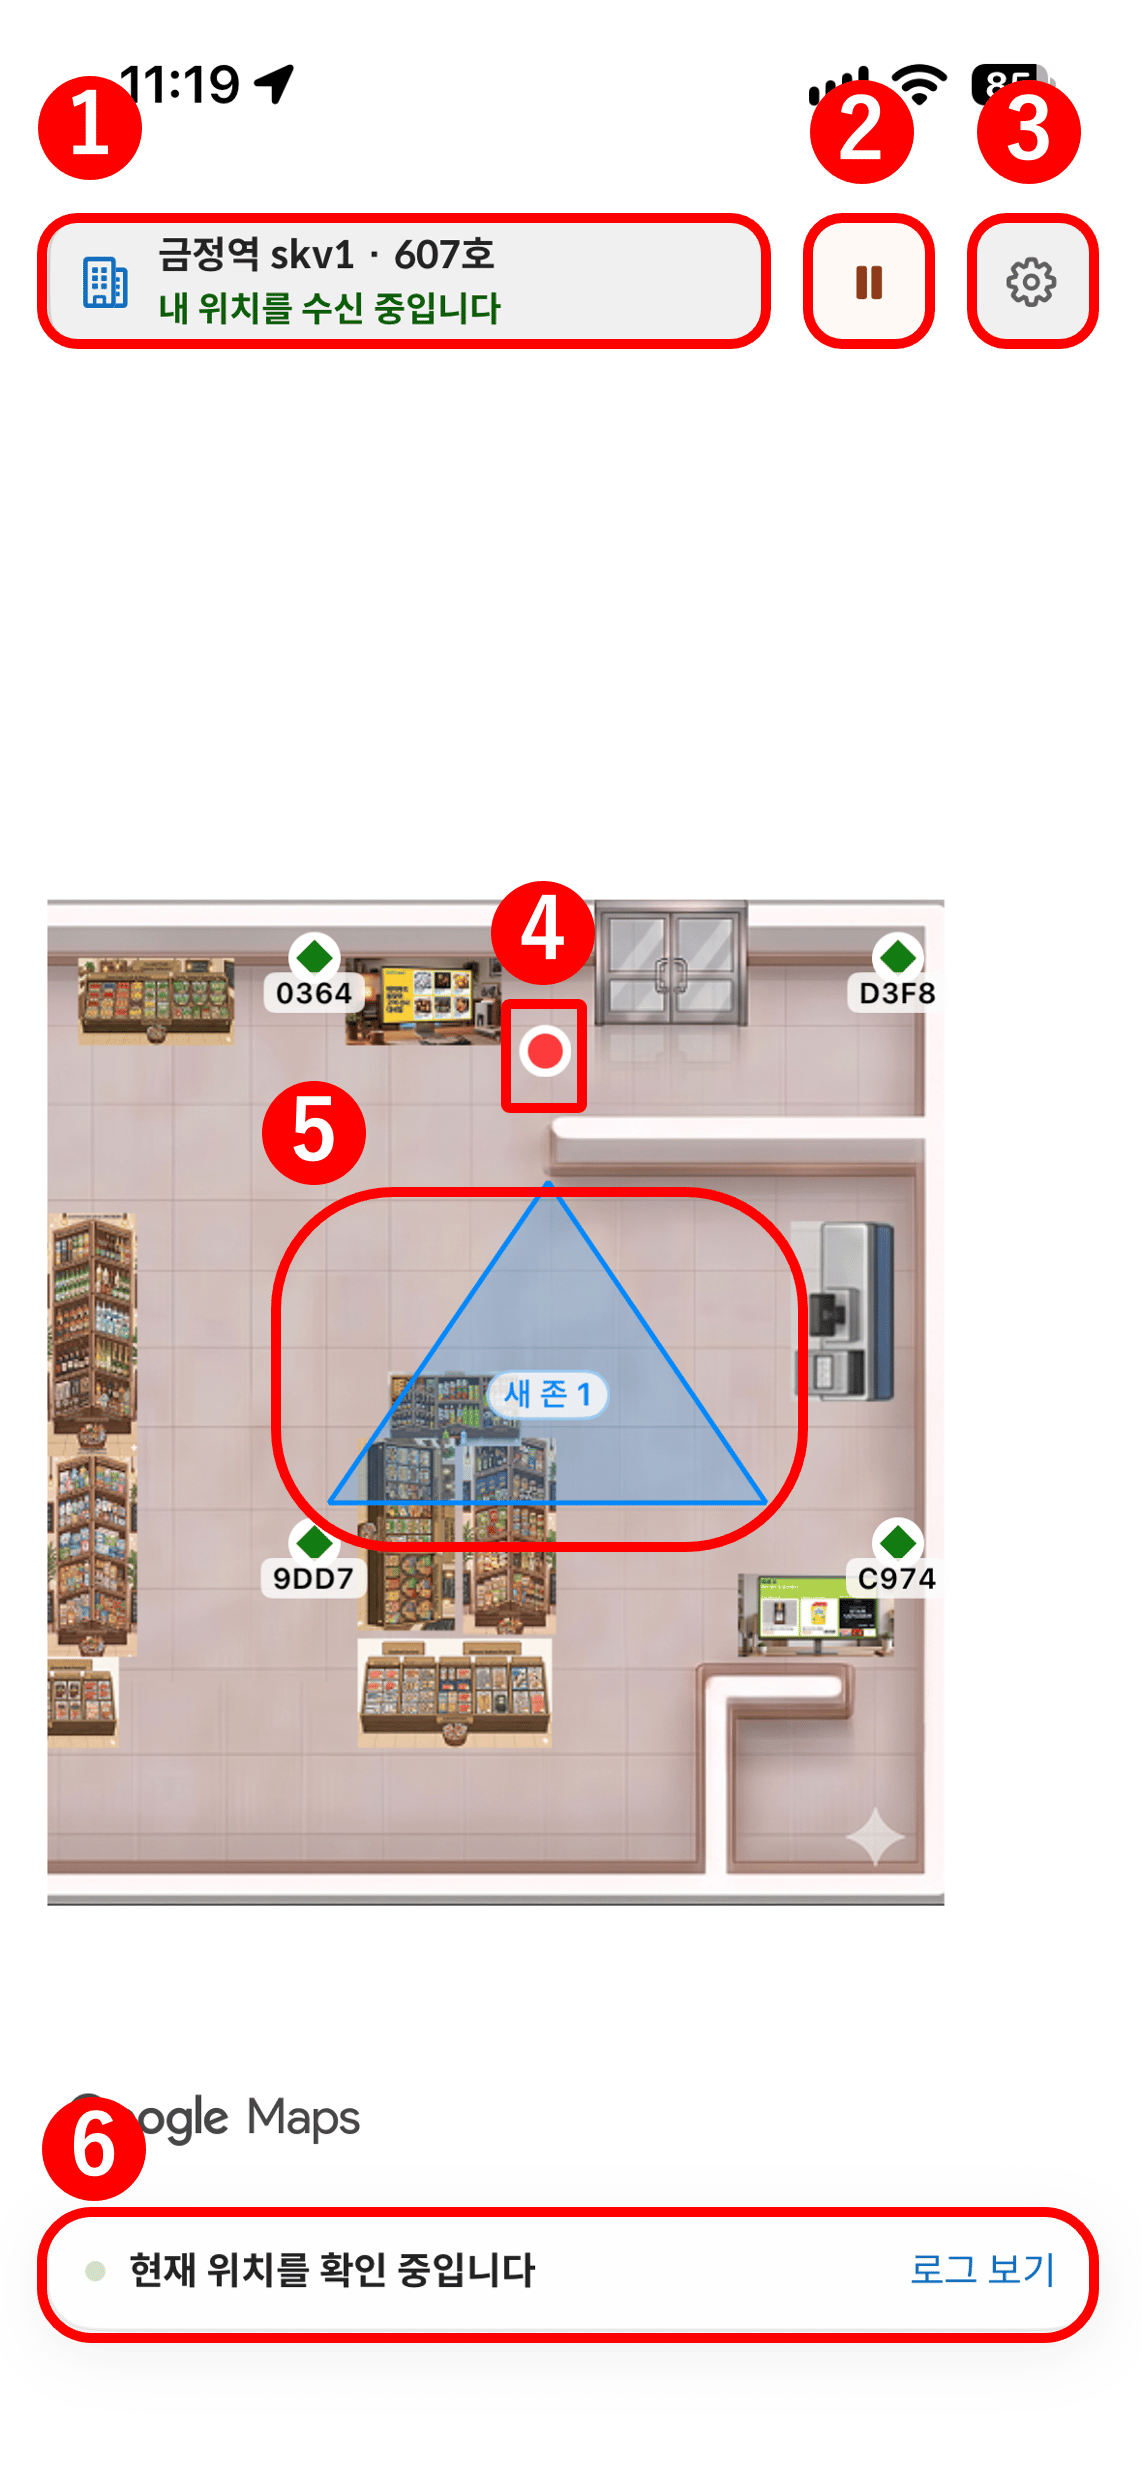 Once even one locator on a floor is detected, that floor is recognized automatically. The screen is laid out as follows.
**① Recognized building and floor**
When a locator is detected, the recognized building and floor name and the 'Receiving your position' status appear automatically.
**② Pause button**
Positioning starts automatically with no start action; use this to pause and resume it.
| State | Button | Locator markers |
| - | - | - |
| Positioning | Pause icon | Green |
| Paused | Play icon | Gray |
* Locator markers can also show gray (inactive) when positioning is unstable.
**③ Settings button**
Opens the settings screen.
**④ Checking your position**
If your position dot appears on the plan, positioning has started properly.
Verify its accuracy as follows.
* Stand at the center of the detection area formed by the 4 locators and confirm the position dot appears on the plan.
* Walk slowly from one end of the detection area to the other and confirm the dot follows your actual path.
* Stand directly under each locator and confirm the dot appears at that corner on the plan.
This is the most reliable way to verify the coordinates and plan placement.
* Stand at a spot recognizable on the plan, such as a shelf or the entrance, and confirm the dot appears near it.
* The app may show the plan in a different orientation than the GeoSpace screen, so orient yourself by the entrance.
* The dot drifts slightly even when you stand still. As long as it stays near where you are standing, this is normal.
**Floors without a registered plan**
Once even one locator on a floor is detected, that floor is recognized automatically. The screen is laid out as follows.
**① Recognized building and floor**
When a locator is detected, the recognized building and floor name and the 'Receiving your position' status appear automatically.
**② Pause button**
Positioning starts automatically with no start action; use this to pause and resume it.
| State | Button | Locator markers |
| - | - | - |
| Positioning | Pause icon | Green |
| Paused | Play icon | Gray |
* Locator markers can also show gray (inactive) when positioning is unstable.
**③ Settings button**
Opens the settings screen.
**④ Checking your position**
If your position dot appears on the plan, positioning has started properly.
Verify its accuracy as follows.
* Stand at the center of the detection area formed by the 4 locators and confirm the position dot appears on the plan.
* Walk slowly from one end of the detection area to the other and confirm the dot follows your actual path.
* Stand directly under each locator and confirm the dot appears at that corner on the plan.
This is the most reliable way to verify the coordinates and plan placement.
* Stand at a spot recognizable on the plan, such as a shelf or the entrance, and confirm the dot appears near it.
* The app may show the plan in a different orientation than the GeoSpace screen, so orient yourself by the entrance.
* The dot drifts slightly even when you stand still. As long as it stays near where you are standing, this is normal.
**Floors without a registered plan**
Only the position dot is shown, with no plan. Positioning has started once the building and floor are recognized automatically and 'Receiving your position' appears;
to check accuracy, stand under each locator and confirm the dot appears toward that corner of the screen.
**⑤ Zones**
* Zones can be added in OneS1ght [Space Management](/en/locator/areas).
* Zones registered in OneS1ght appear on the plan immediately.
**⑥ Bottom status and \[View log]**
The bottom shows the positioning status ('Finding where you are', etc.).
**When permissions are missing**
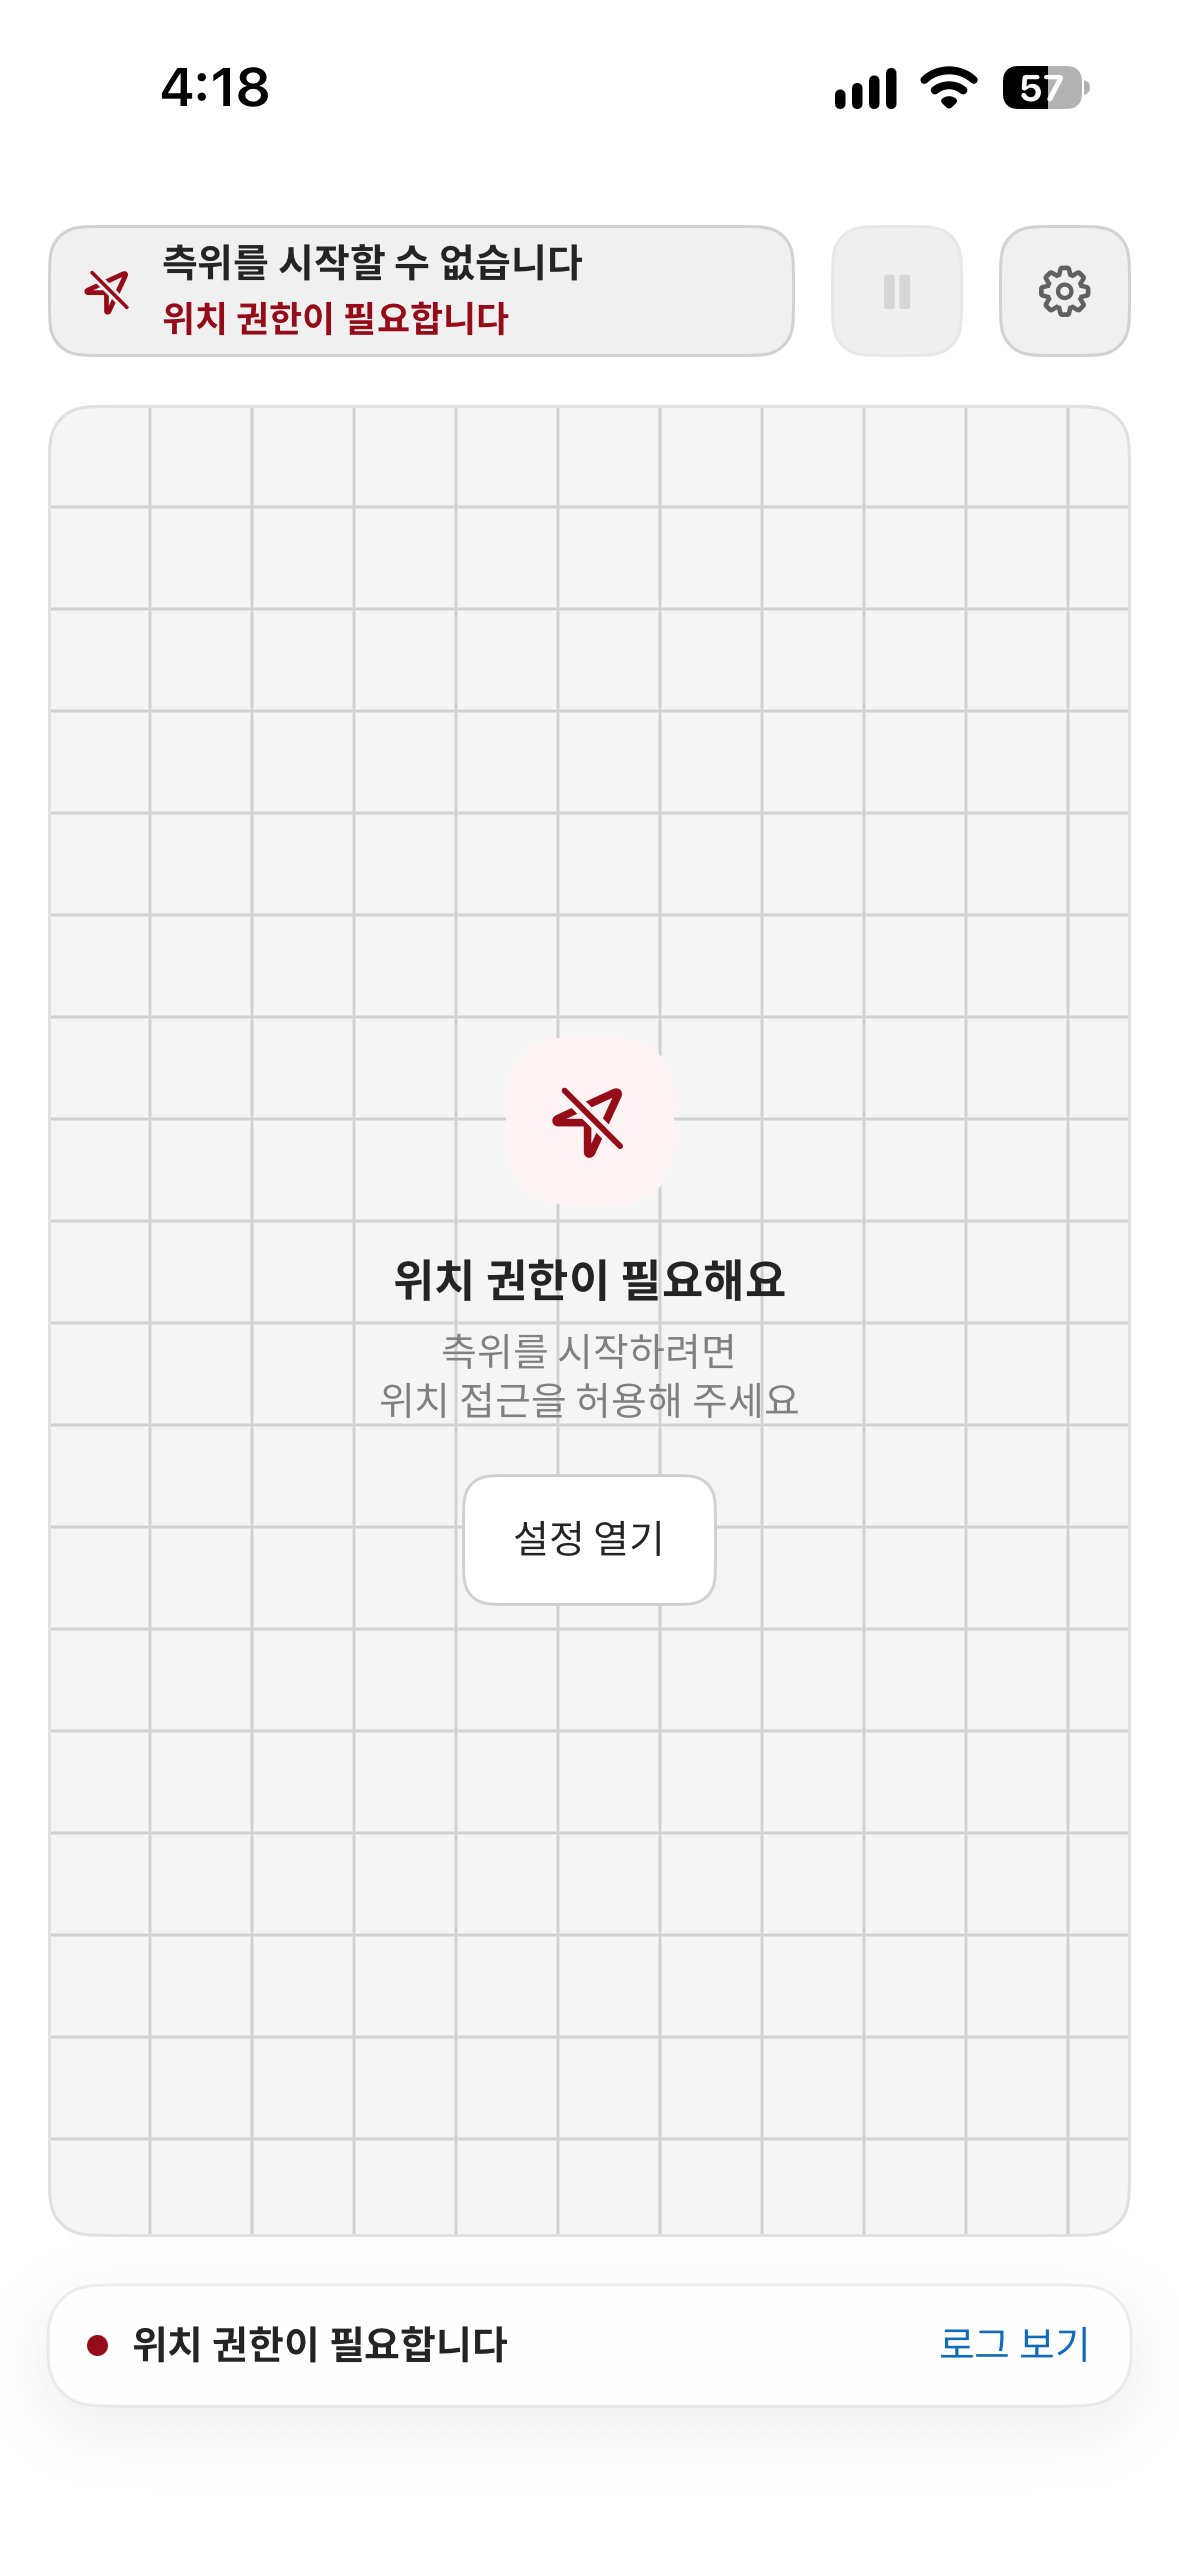 | State | Display | Action |
| - | - | - |
| No location permission | ·A screen saying positioning cannot start is shown | ·Click \[Open Settings] and allow location access |
| Bluetooth off | ·'Please turn on Bluetooth. Bluetooth is needed to find locators.' is shown | ·Turn Bluetooth on and continue |
**(5) View log**
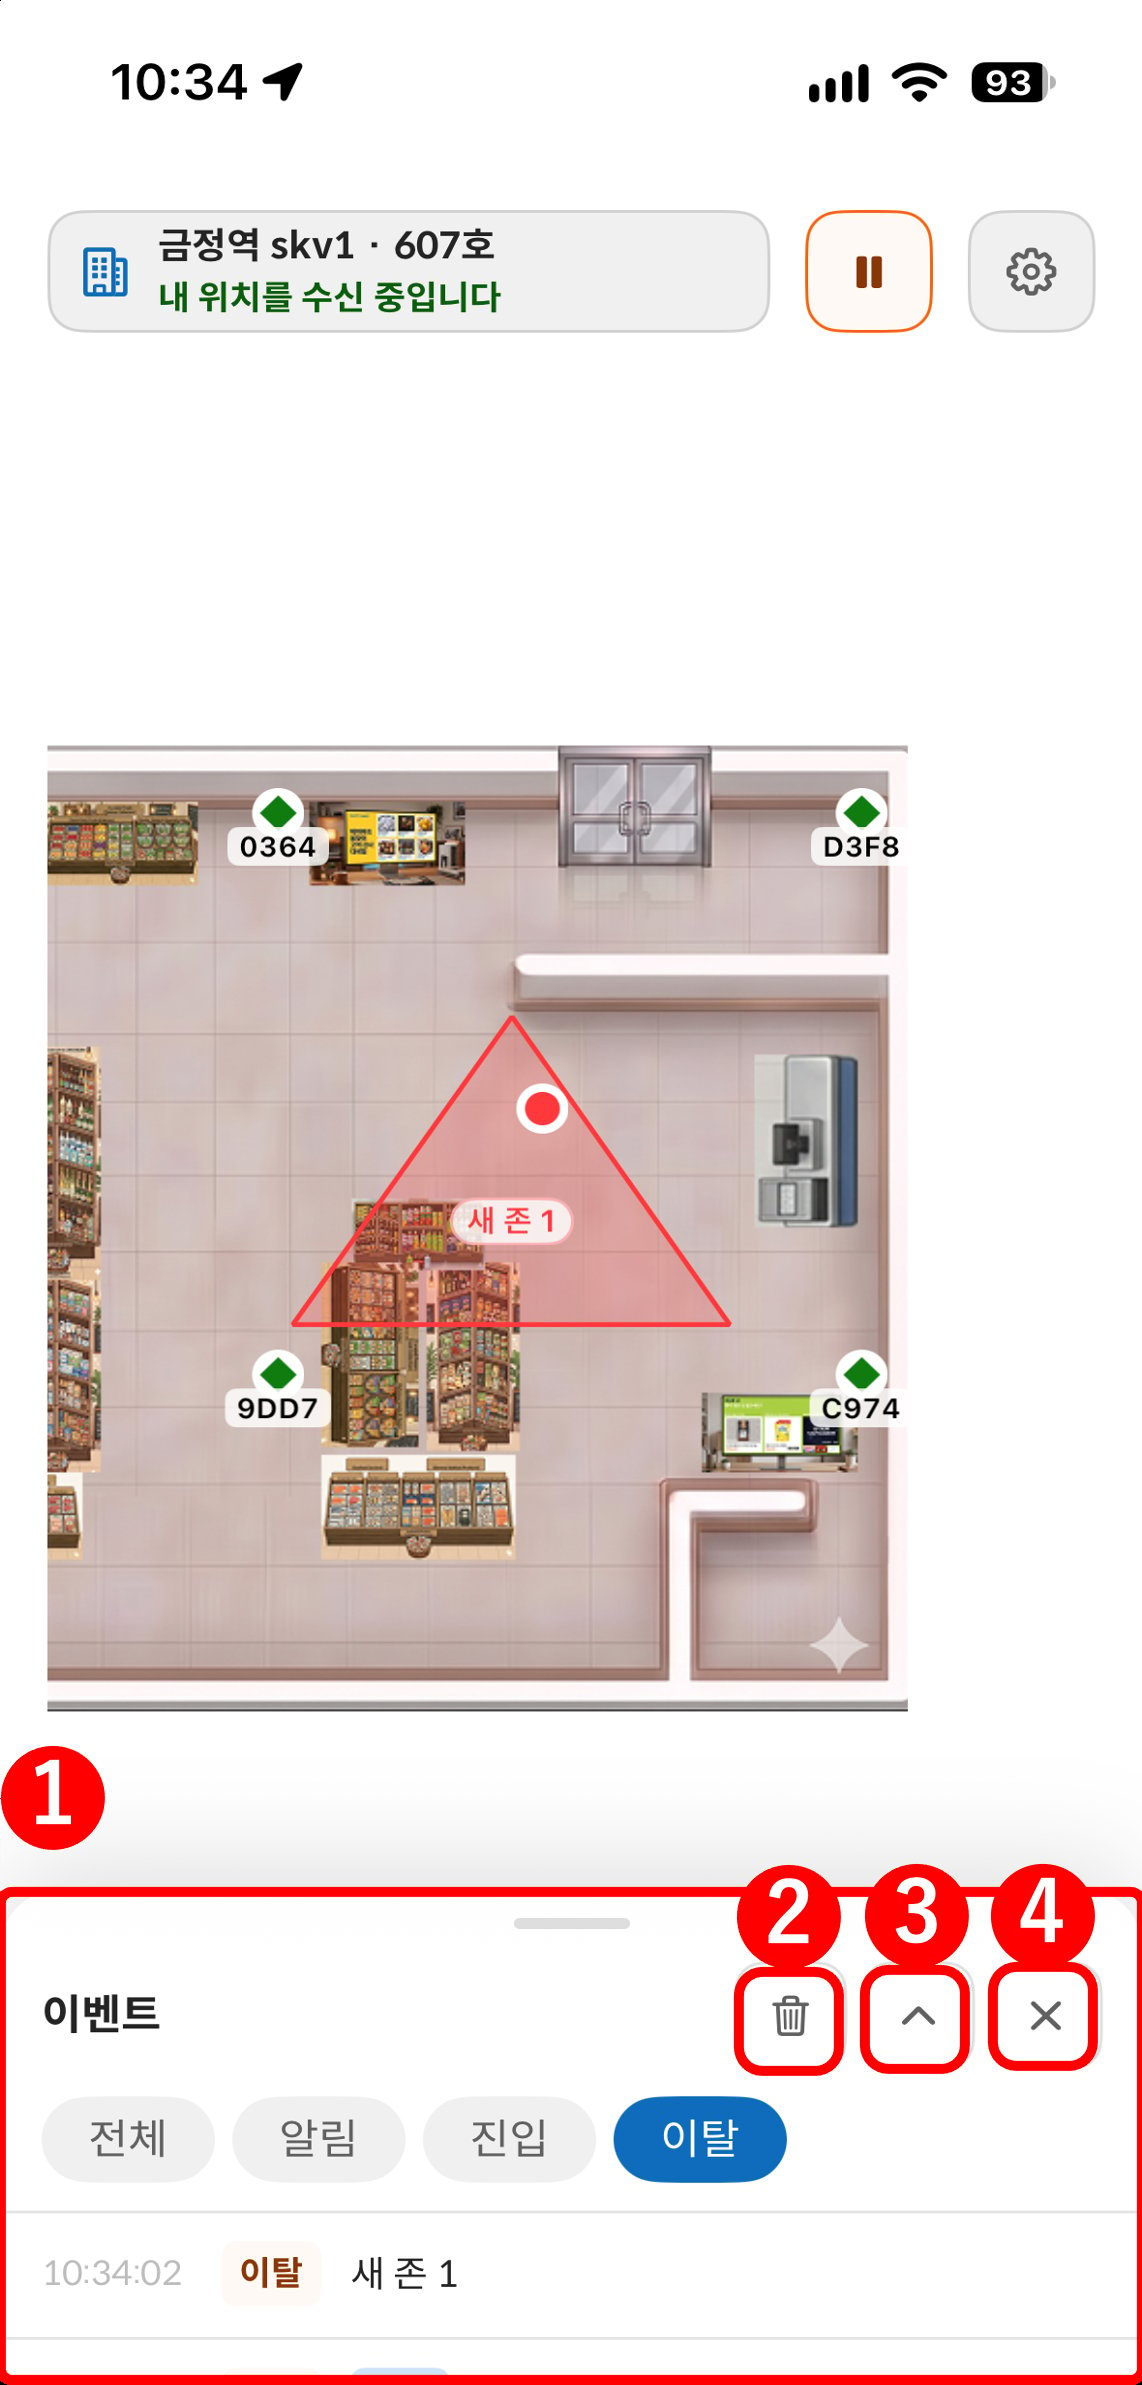
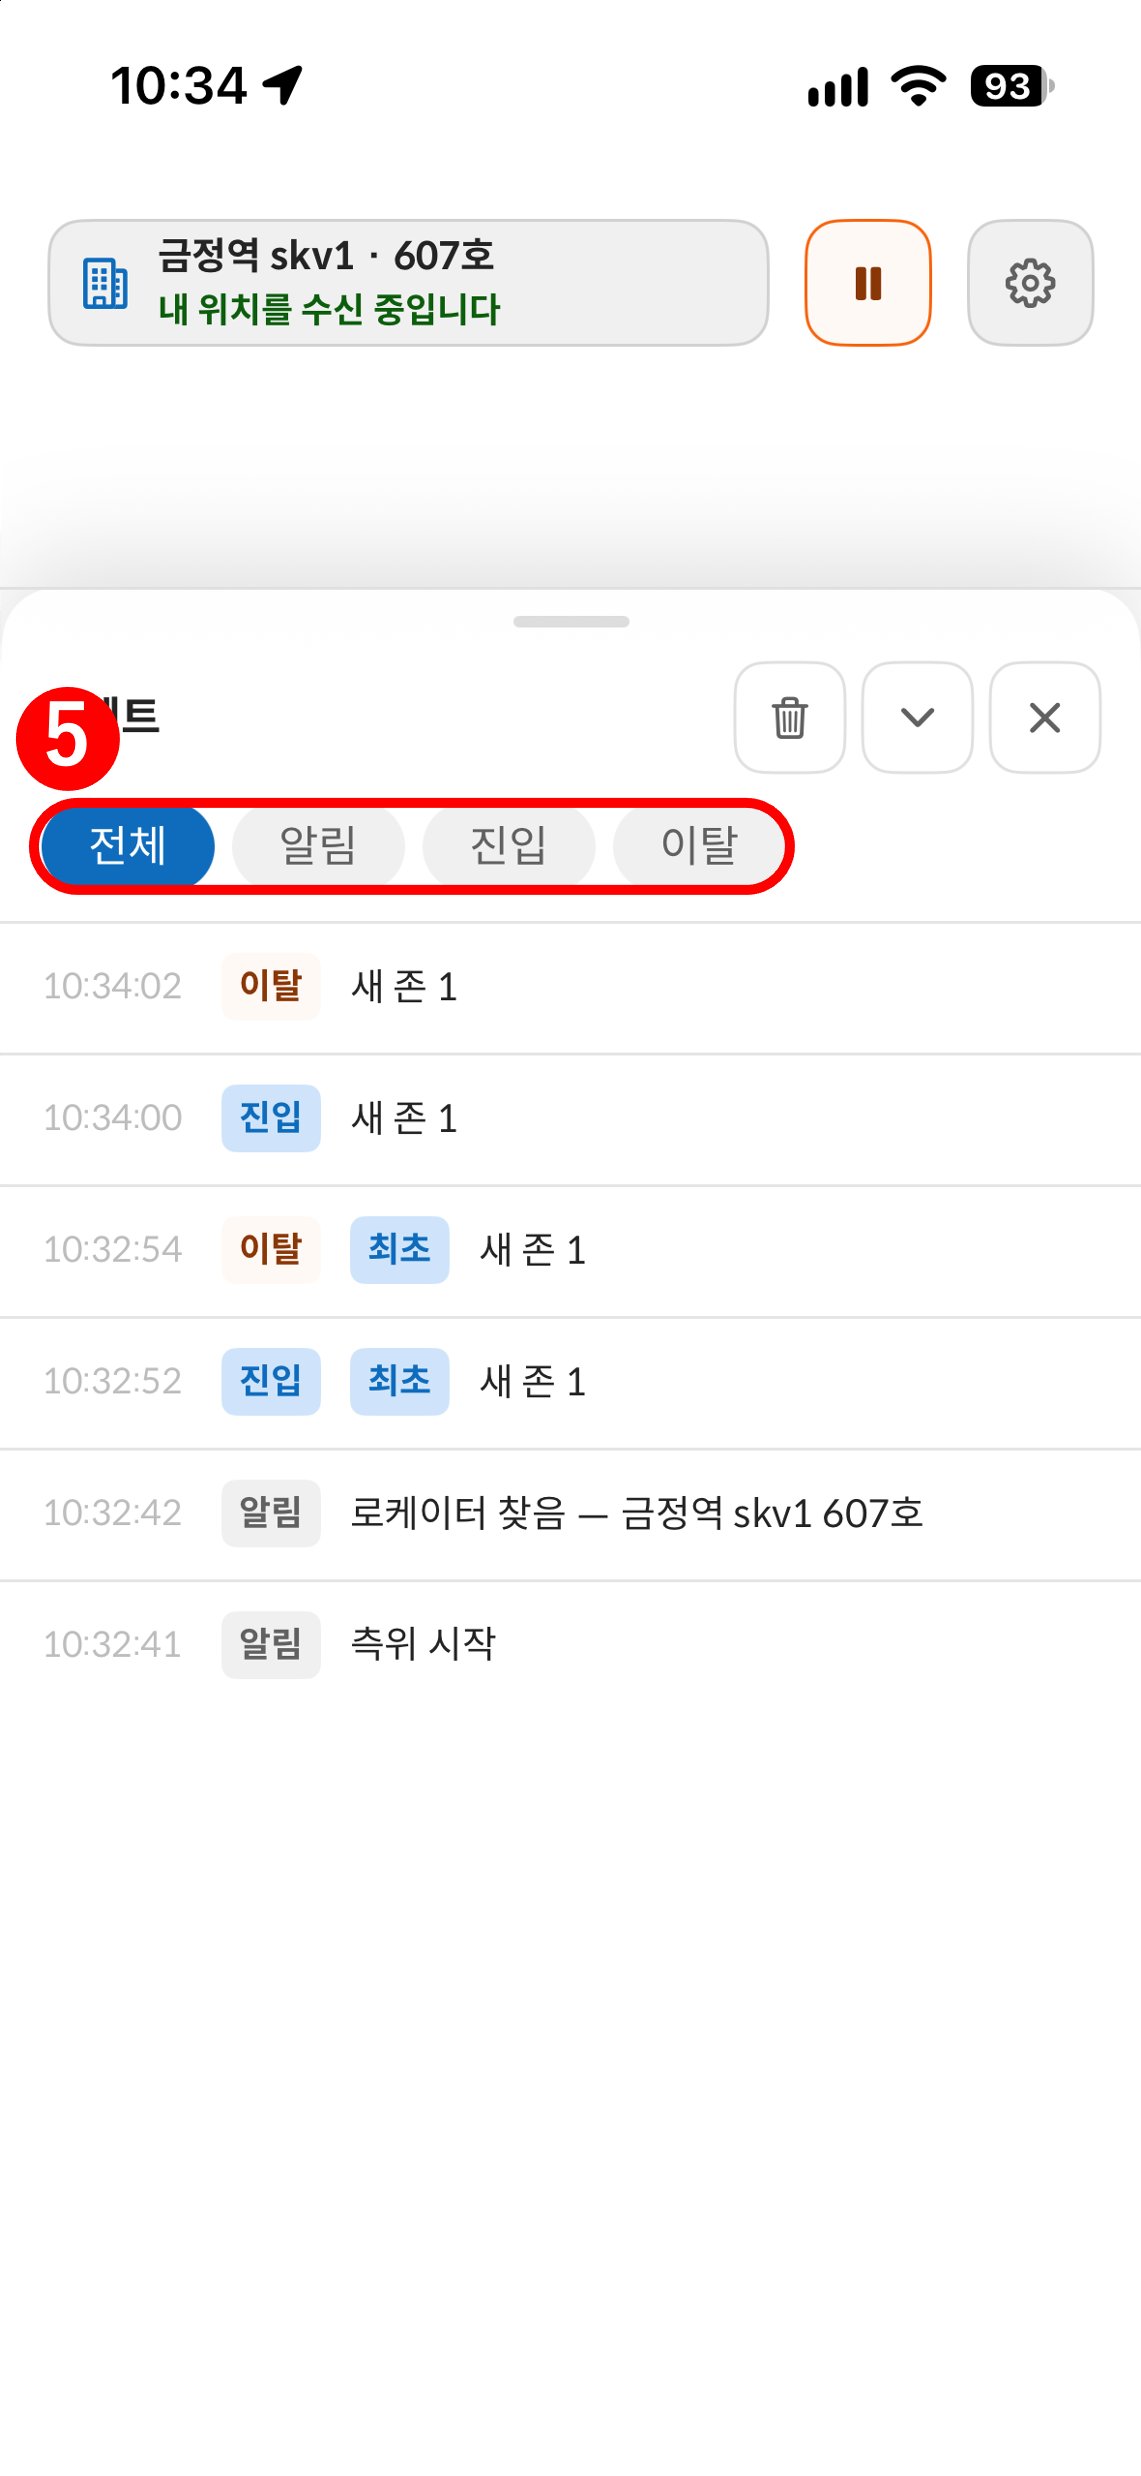
Clicking \[View log] at the bottom opens an event panel showing positioning progress
and zone enter and exit events in chronological order.
| State | Display | Action |
| - | - | - |
| No location permission | ·A screen saying positioning cannot start is shown | ·Click \[Open Settings] and allow location access |
| Bluetooth off | ·'Please turn on Bluetooth. Bluetooth is needed to find locators.' is shown | ·Turn Bluetooth on and continue |
**(5) View log**
Clicking \[View log] at the bottom opens an event panel showing positioning progress
and zone enter and exit events in chronological order.
 | Part | Function |
| - | - |
| ① Event list | ·Shows positioning start, locator found, and zone enter and exit events in order |
| ② Delete button | ·Clears the event list |
| ③ Expand button | ·Expands the panel |
| ④ Close button | ·Closes the panel |
| ⑤ Filters | ·Shows All · Notices · In · Out events separately |
## 4) When Positioning Is Not Working Properly
In the table below, first find **what the screen looks like**, then jump to the matching troubleshooting entry.
| If you see this | Most common cause | Link |
| - | - | - |
| No dot appears at all | ·Cluster not applied·Device without UWB | [Troubleshooting](/en/troubleshooting#no-position-dot-in-the-app) |
| A "Can't find locator signal" screen appears | ·Left the detection area·Locator signal problem | [Troubleshooting](/en/troubleshooting#locator-signal-cannot-be-found) |
| Standing under a locator, but the dot shows at a **different corner** | ·Wrong coordinates, or the locator placed at the wrong spot on the plan | [Troubleshooting](/en/troubleshooting#position-shows-in-the-wrong-place) |
| The dot is **consistently shifted to one side** | ·The reference point or reference direction differs from reality | [Troubleshooting](/en/troubleshooting#position-shows-in-the-wrong-place) |
| You moved a few steps but the dot moved **much farther, or barely** | ·Plan scale differs from real dimensions | [Troubleshooting](/en/troubleshooting#moved-distance-does-not-match-reality) |
| The dot **jumps around badly** while you stand still | ·Metal interference·Locators mounted too low | [Troubleshooting](/en/troubleshooting#position-shakes-or-jumps-badly) |
## 5) Space Management · Creating a Zone
A zone is an area you draw on the plan in OneS1ght \[Space Management]; the app uses it as the basis for enter and exit events.
Log in to OneS1ght ([`console.ones1ght.com`](https://console.ones1ght.com)), then go to \[Spaces] in the sidebar and select the building and floor at the top.
Only Managers and above can access it, and zones can be created on floors with a registered plan.
Click \[Edit floor plan] to activate edit mode, then proceed.
| Part | Function |
| - | - |
| ① Event list | ·Shows positioning start, locator found, and zone enter and exit events in order |
| ② Delete button | ·Clears the event list |
| ③ Expand button | ·Expands the panel |
| ④ Close button | ·Closes the panel |
| ⑤ Filters | ·Shows All · Notices · In · Out events separately |
## 4) When Positioning Is Not Working Properly
In the table below, first find **what the screen looks like**, then jump to the matching troubleshooting entry.
| If you see this | Most common cause | Link |
| - | - | - |
| No dot appears at all | ·Cluster not applied·Device without UWB | [Troubleshooting](/en/troubleshooting#no-position-dot-in-the-app) |
| A "Can't find locator signal" screen appears | ·Left the detection area·Locator signal problem | [Troubleshooting](/en/troubleshooting#locator-signal-cannot-be-found) |
| Standing under a locator, but the dot shows at a **different corner** | ·Wrong coordinates, or the locator placed at the wrong spot on the plan | [Troubleshooting](/en/troubleshooting#position-shows-in-the-wrong-place) |
| The dot is **consistently shifted to one side** | ·The reference point or reference direction differs from reality | [Troubleshooting](/en/troubleshooting#position-shows-in-the-wrong-place) |
| You moved a few steps but the dot moved **much farther, or barely** | ·Plan scale differs from real dimensions | [Troubleshooting](/en/troubleshooting#moved-distance-does-not-match-reality) |
| The dot **jumps around badly** while you stand still | ·Metal interference·Locators mounted too low | [Troubleshooting](/en/troubleshooting#position-shakes-or-jumps-badly) |
## 5) Space Management · Creating a Zone
A zone is an area you draw on the plan in OneS1ght \[Space Management]; the app uses it as the basis for enter and exit events.
Log in to OneS1ght ([`console.ones1ght.com`](https://console.ones1ght.com)), then go to \[Spaces] in the sidebar and select the building and floor at the top.
Only Managers and above can access it, and zones can be created on floors with a registered plan.
Click \[Edit floor plan] to activate edit mode, then proceed.
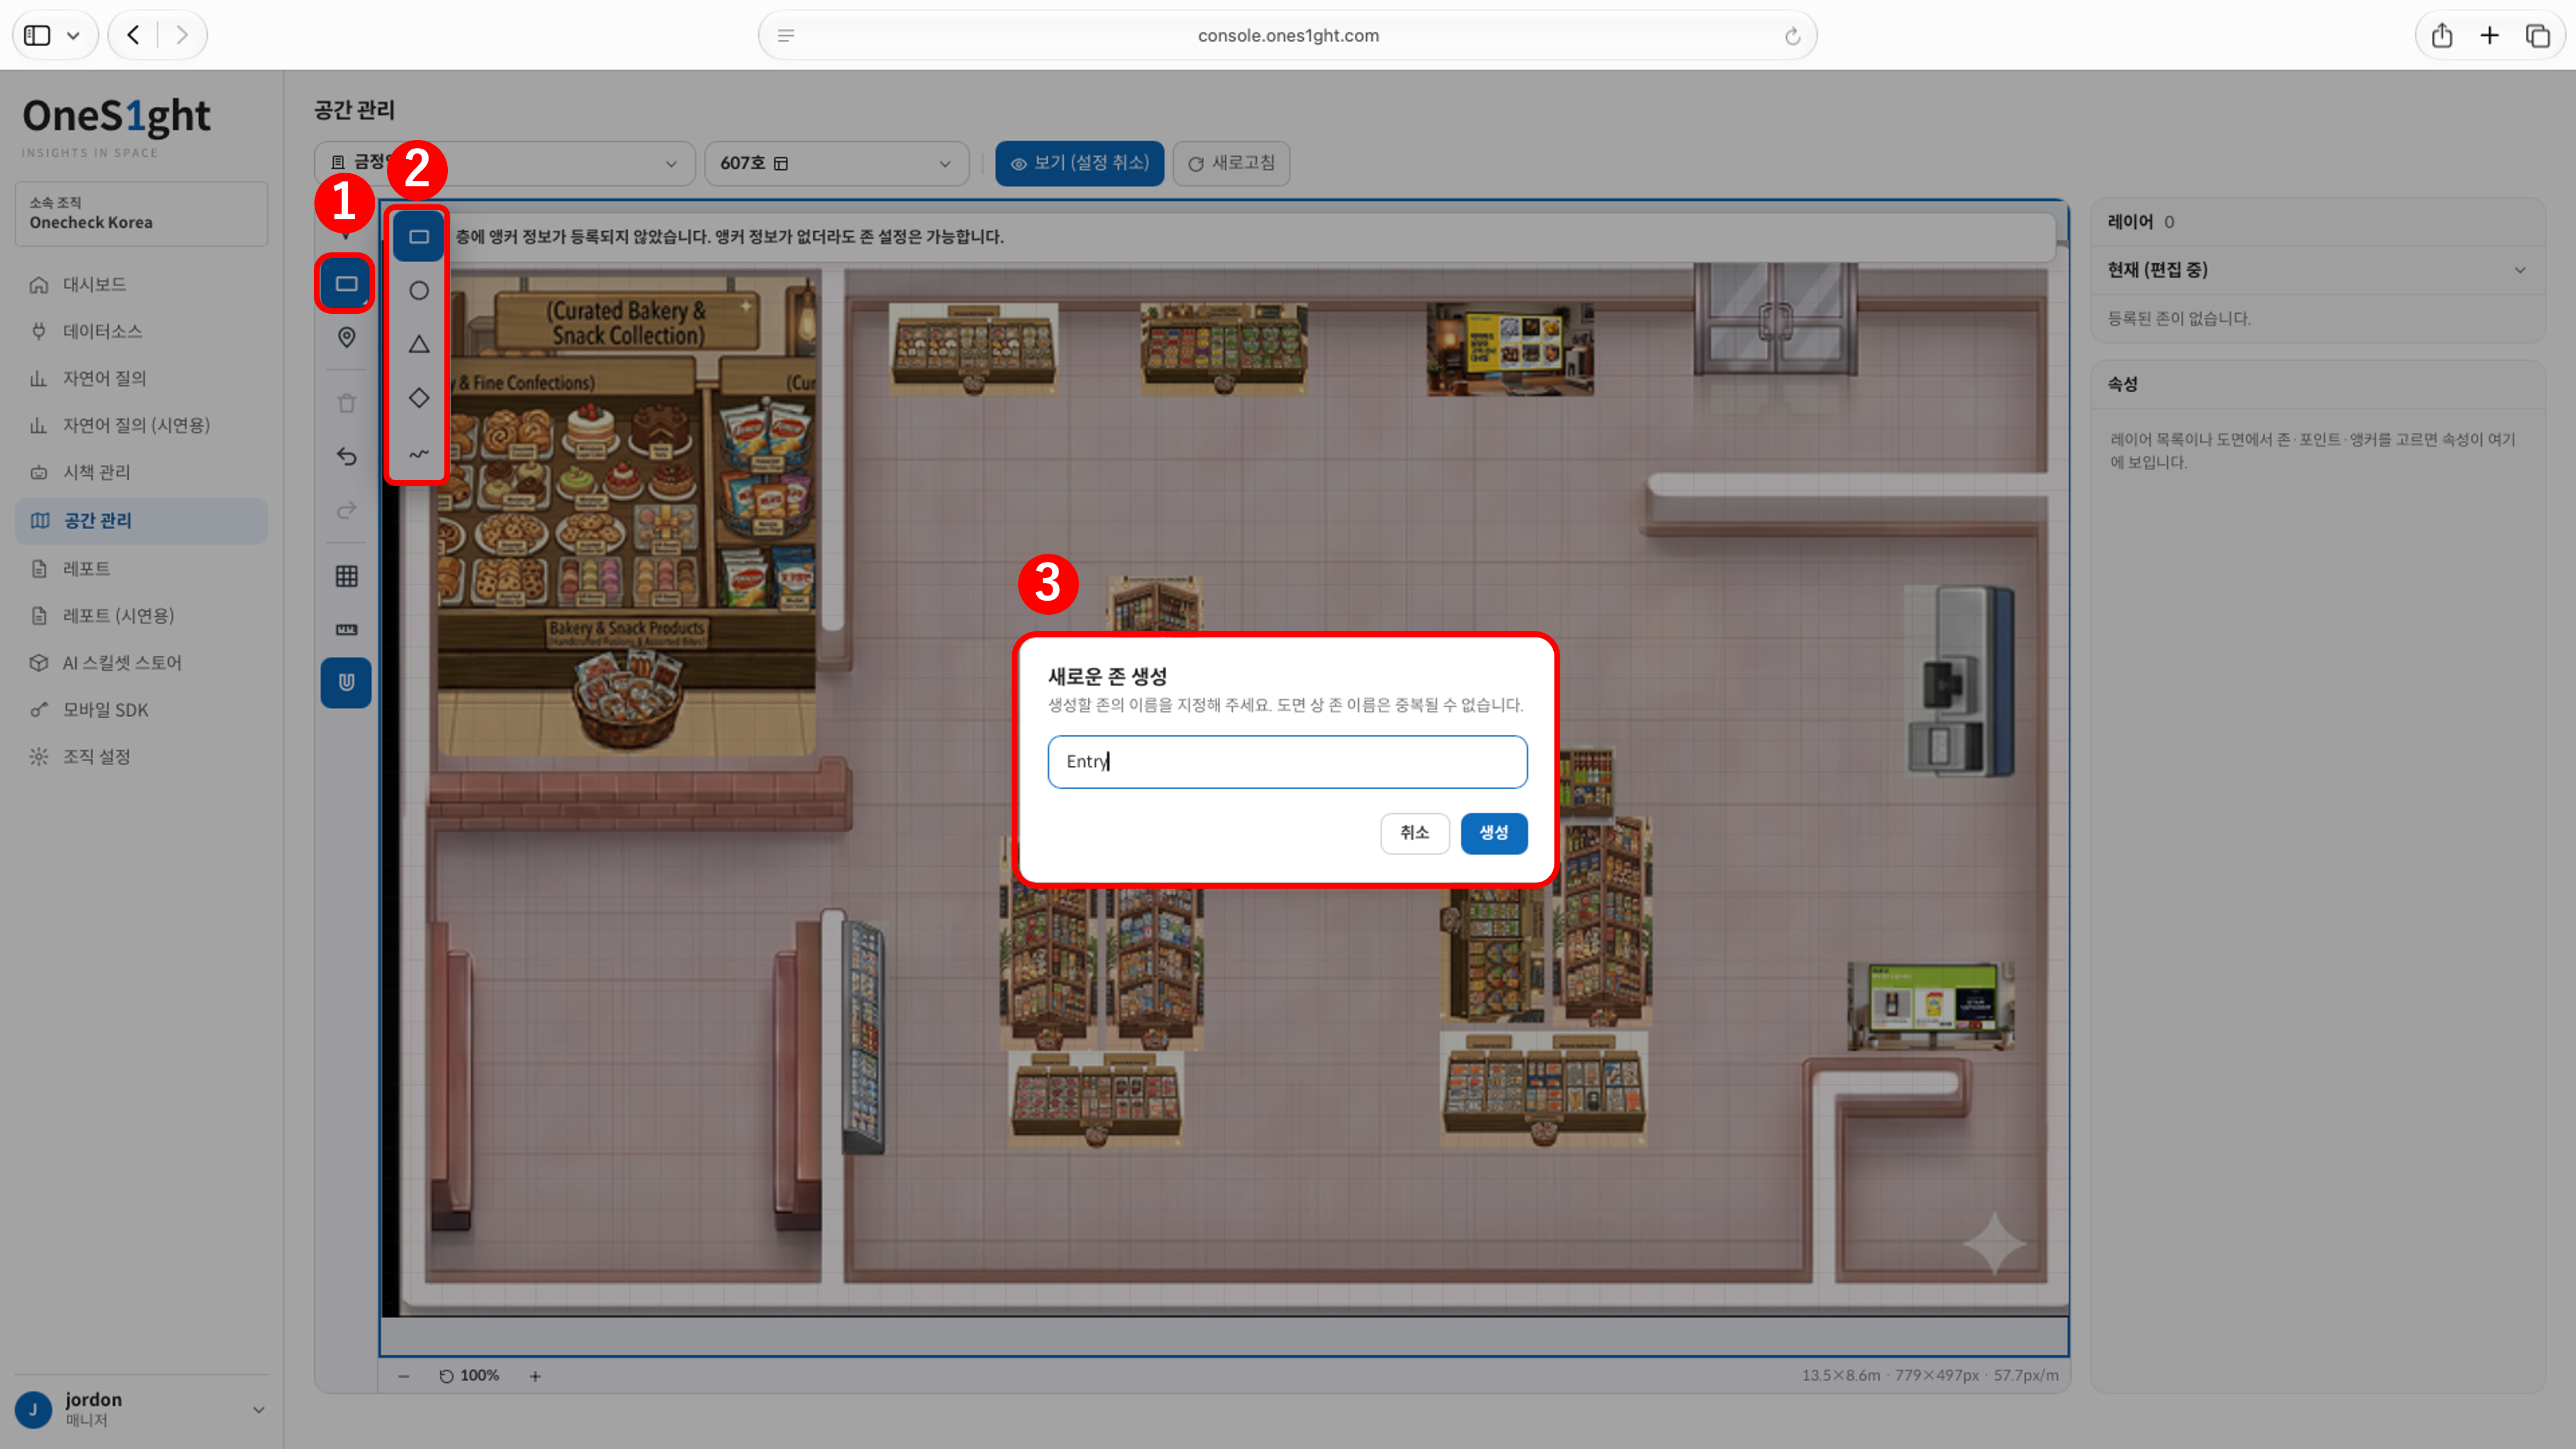 1. Click \[Draw Zone].
2. Pick a shape, then choose where to create the zone on the plan canvas and drag to draw it.
* For irregular shapes pick Freehand; to keep things aligned, turn on Snap.
* For a freehand shape, place 3 or more points along the area you want,
then double-click at the last point or click the first point to close the area.
Closing it opens the same 'Create new zone' popup as in step 3.
3. In the 'Create new zone' popup, enter a zone name (e.g., Entrance, Checkout, A-1) and click \[Create].
1. Click \[Draw Zone].
2. Pick a shape, then choose where to create the zone on the plan canvas and drag to draw it.
* For irregular shapes pick Freehand; to keep things aligned, turn on Snap.
* For a freehand shape, place 3 or more points along the area you want,
then double-click at the last point or click the first point to close the area.
Closing it opens the same 'Create new zone' popup as in step 3.
3. In the 'Create new zone' popup, enter a zone name (e.g., Entrance, Checkout, A-1) and click \[Create].
Zone names cannot be duplicated on the same floor.
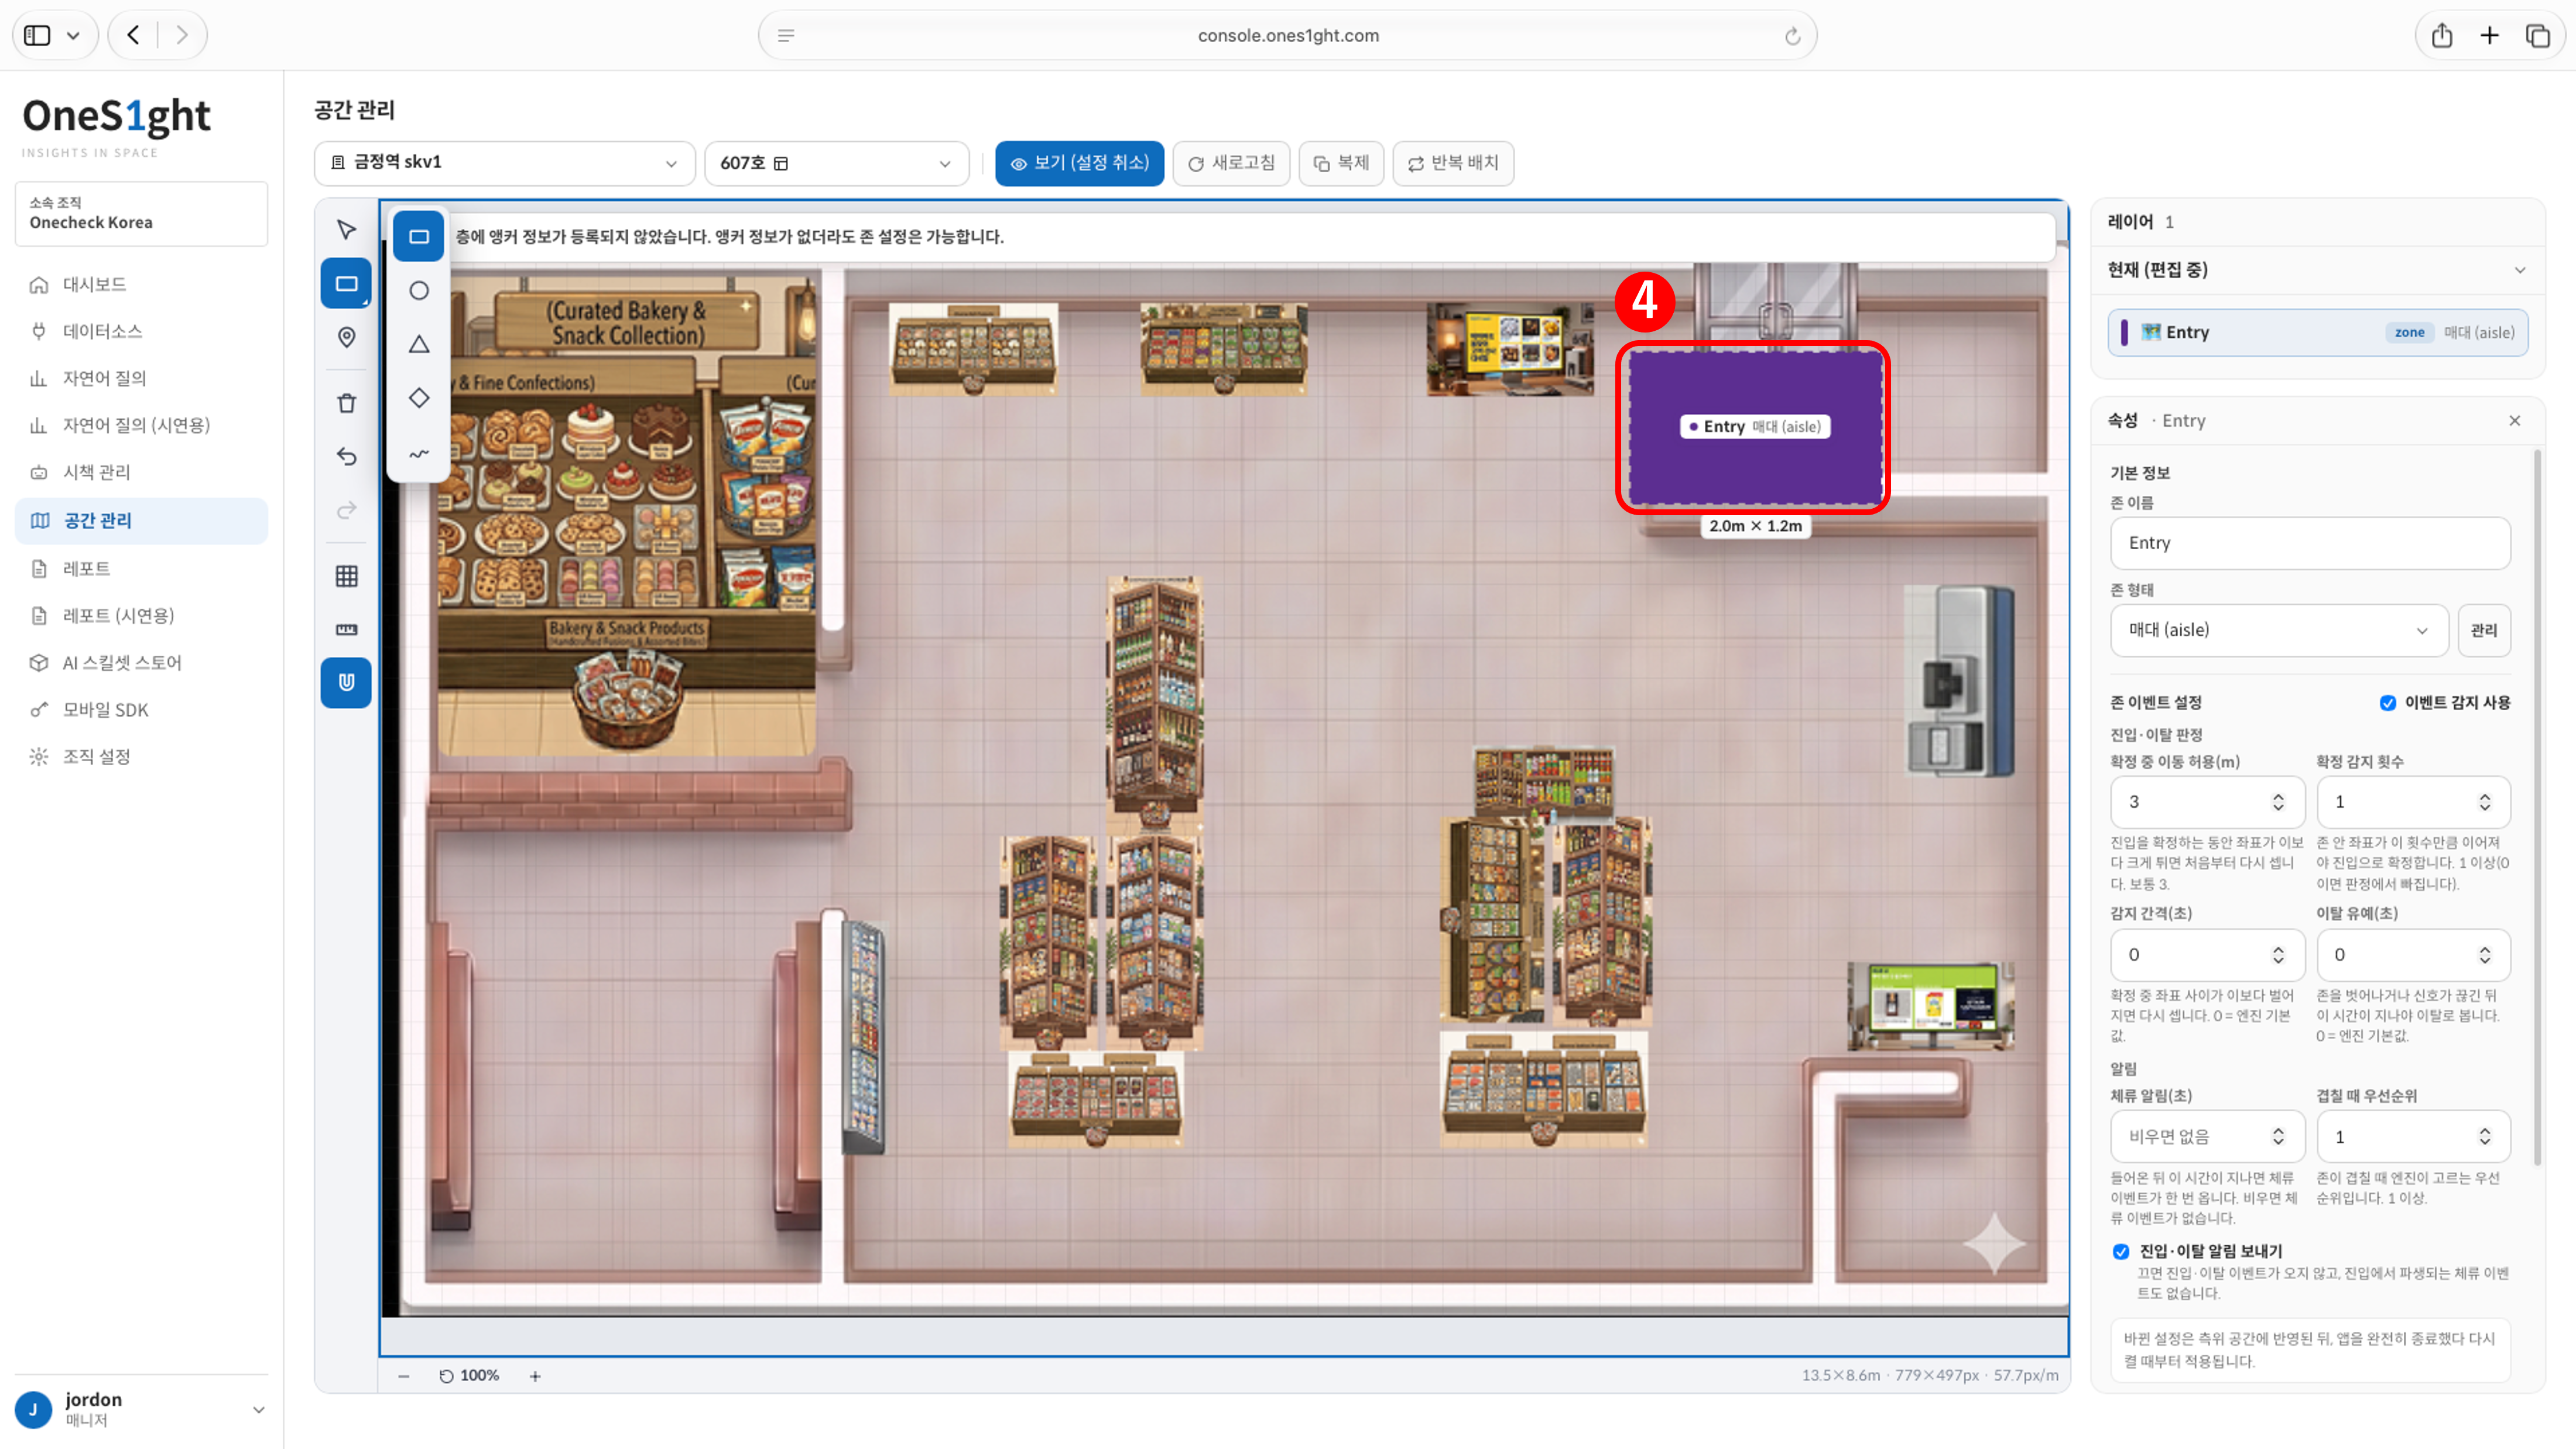 4. **Confirm the created zone**
* Confirm the new zone appears on the plan and in the layer list.
The canvas shows the zone's real size (e.g., 2.0 m × 1.2 m), so you can check its extent.
* To select a zone, the editing tool on the left must be the Select tool.
Clicking the zone opens the Properties panel on the right.
* Zones are created with the default type Aisle (`aisle`); change it to match the purpose.
* The zone event settings work with their defaults.
See [5) SDK Area Detection](/en/locator/areas#5-sdk-area-detection) for what each field means.
A selected zone can be adjusted with the mouse.
* Select inside the zone and drag to move it.
* Drag the corner handles to change its size and shape.
Moving or resizing activates the green \[Save] button at the top of the menu.
Edits such as moving and resizing only reach GeoSpace (the positioning space) once you click \[Save (N)] at the top.
Until saved, they stay 'Unapplied' on this screen only; the number in parentheses is the count of unapplied changes.
If a zone is too small, positioning error can cause repeated enter and exit events.
Define zones around where a person stands and stays, not around a single shelf.
For details, see [Space Management](/en/locator/areas).
## Checklist
Once all items below are confirmed, the positioning infrastructure setup is complete.
| # | Item | Check |
| - | - | :-: |
| 1 | The LEDs on all 4 installed locators are lit.
4. **Confirm the created zone**
* Confirm the new zone appears on the plan and in the layer list.
The canvas shows the zone's real size (e.g., 2.0 m × 1.2 m), so you can check its extent.
* To select a zone, the editing tool on the left must be the Select tool.
Clicking the zone opens the Properties panel on the right.
* Zones are created with the default type Aisle (`aisle`); change it to match the purpose.
* The zone event settings work with their defaults.
See [5) SDK Area Detection](/en/locator/areas#5-sdk-area-detection) for what each field means.
A selected zone can be adjusted with the mouse.
* Select inside the zone and drag to move it.
* Drag the corner handles to change its size and shape.
Moving or resizing activates the green \[Save] button at the top of the menu.
Edits such as moving and resizing only reach GeoSpace (the positioning space) once you click \[Save (N)] at the top.
Until saved, they stay 'Unapplied' on this screen only; the number in parentheses is the count of unapplied changes.
If a zone is too small, positioning error can cause repeated enter and exit events.
Define zones around where a person stands and stays, not around a single shelf.
For details, see [Space Management](/en/locator/areas).
## Checklist
Once all items below are confirmed, the positioning infrastructure setup is complete.
| # | Item | Check |
| - | - | :-: |
| 1 | The LEDs on all 4 installed locators are lit.
(Top LED: green, bottom LED: blue. After the cluster is 'Deployment Complete', a blinking bottom LED is also normal) | ☐ |
| 2 | The position dot appears on screen and moves as you move. | ☐ |
| 3 | Space Management shows the actual plan uploaded to GeoSpace. (If a plan is registered) | ☐ |
| 4 | The verification app shows the site plan properly. (If a plan is registered) | ☐ |
| 5 | At each of the four corners, the dot appears at the matching spot on the plan. (If a plan is registered) | ☐ |
| 6 | The verification app recognizes the building and floor automatically and shows 'Receiving your position'. (If no plan is registered) | ☐ |
| 7 | Standing under each locator, the dot appears toward that corner of the screen. (If no plan is registered) | ☐ |
| 8 | You created a zone and clicked \[Save (N)] to push it to GeoSpace. (If using zones) | ☐ |
Full manual: [8. Verification](/en/geospace/verify)
This documentation is built and hosted on [Mintlify](https://mintlify.com), a developer documentation platform.