> ## Documentation Index
> Fetch the complete documentation index at: https://docs.ones1ght.com/llms.txt
> Use this file to discover all available pages before exploring further.
# Mobile Demo (2026.07.26)
> A hands-on package guide to try before your production integration — from key issuance to building the demo app and experiencing indoor positioning and coupons.
This guide walks you through the **entire flow before a production integration**.
Starting from nothing, you'll go step by step: issue keys → confirm infrastructure →
build the app → try it out. (Build takes about 5 minutes.)
## Overview
| Step | What you do | In this demo |
| ----------------------------- | ------------------------------------ | --------------------------------------------------------------- |
| 1. Prepare keys | Issue SDK and GeoSpace keys | **Provided by your contact** (you can also issue them yourself) |
| 2. Positioning infrastructure | Build spaces, install locators | ✅ Already set up (demo site) |
| 3. Create areas (zones) | Register event areas in the console | You can try this yourself |
| 4. Build the demo app | Clone → add keys → install on device | You do this |
| 5. Try it out | Positioning → zone entry → coupon | You do this (at the demo site) |
***
## 1. Prepare keys
Running the demo requires **three keys**. Receiving them from your contact is the fastest path.
| Key | Where to issue | Purpose |
| ------------- | ----------------------------------------------------------------------------- | --------------------------------------------------------- |
| `ock_sdk_...` | OneS1ght console → **Mobile SDK Keys** menu ([details](/en/locator/sdk-keys)) | OneS1ght server authentication (positioning data, events) |
| `gsk_...` | GeoSpace Intelligence Hub → Onboarding & Settings → **Mobile** → SDK Key | Access to GeoSpace positioning data |
| `gpk_...` | GeoSpace Intelligence Hub → Partner API | Building, floor plan, and zone integration |
**The OneS1ght SDK key (`ock_`) and the GeoSpace SDK key (`gsk_`) are different keys.**
Both consoles have an "SDK Key" menu, so use the prefix to tell them apart.
After issuing the partner key (`gpk_`), register it in **OneS1ght console → Settings → Positioning connection**
to connect real floor plan and zone data.
## 2. Positioning infrastructure (demo: ready)
Positioning requires spaces (building, floor, plan) and locators (UWB anchors) to be set up.
**This is already done at the demo site, so you can skip this step.** If you'd like to see the full process:
Create buildings and floors, upload floor plans
Register hardware → install and measure on site → place on the plan
**Demo site configuration**
* Korea: **Geumjeong Station skv1 · Room 607** (for verifying positioning)
* Japan: **Akasaka 35 Kowa Building · 304** — a conference room measuring approx. 5.6 × 11.3 m, with 4 anchors placed at the corners
**To register a new location**, first take **interior measurements** of the target space, then set up
the floor plan through [Build spaces](/en/geospace/spaces) (building, floor, plan upload) →
[Locator setup](/en/geospace/locators) (anchor installation, measurement, placement).
## 3. Create areas (zones)
You can create event areas in two ways.
| Method | Path | Description |
| ------------------------ | ---------------------------------------------------------------------------------------- | ----------------------------------------------------------------------------------------------------------------------------------------------------------------------------------------- |
| **Draw manually** | OneS1ght console → **Space management** | Draw a polygon on the floor plan — [details](/en/locator/areas) |
| **Create with an agent** | OneS1ght console → **Natural language query** → [Action agents](/en/agent/action-agents) | Register the **suggestion card** shown with the query answer via "Add to action management" → when you **run (activate)** that item, it is **automatically mapped into Space management** |
### Drawing manually (Space management)
Choose the target floor from the list of buildings and floors registered in GeoSpace Intelligence.
Press **\[Draw zone]** and click on the plan —
**click: add vertex · double-click: close · ESC: cancel** (4 points minimum).
Name the zone and press **\[Save]** to add it to the zone list.
Use **\[Select]** to enter selection mode, pick an existing zone, and remove it with **\[Delete]**.
Pressing **\[Save]** stores your changes **to GeoSpace Intelligence**.
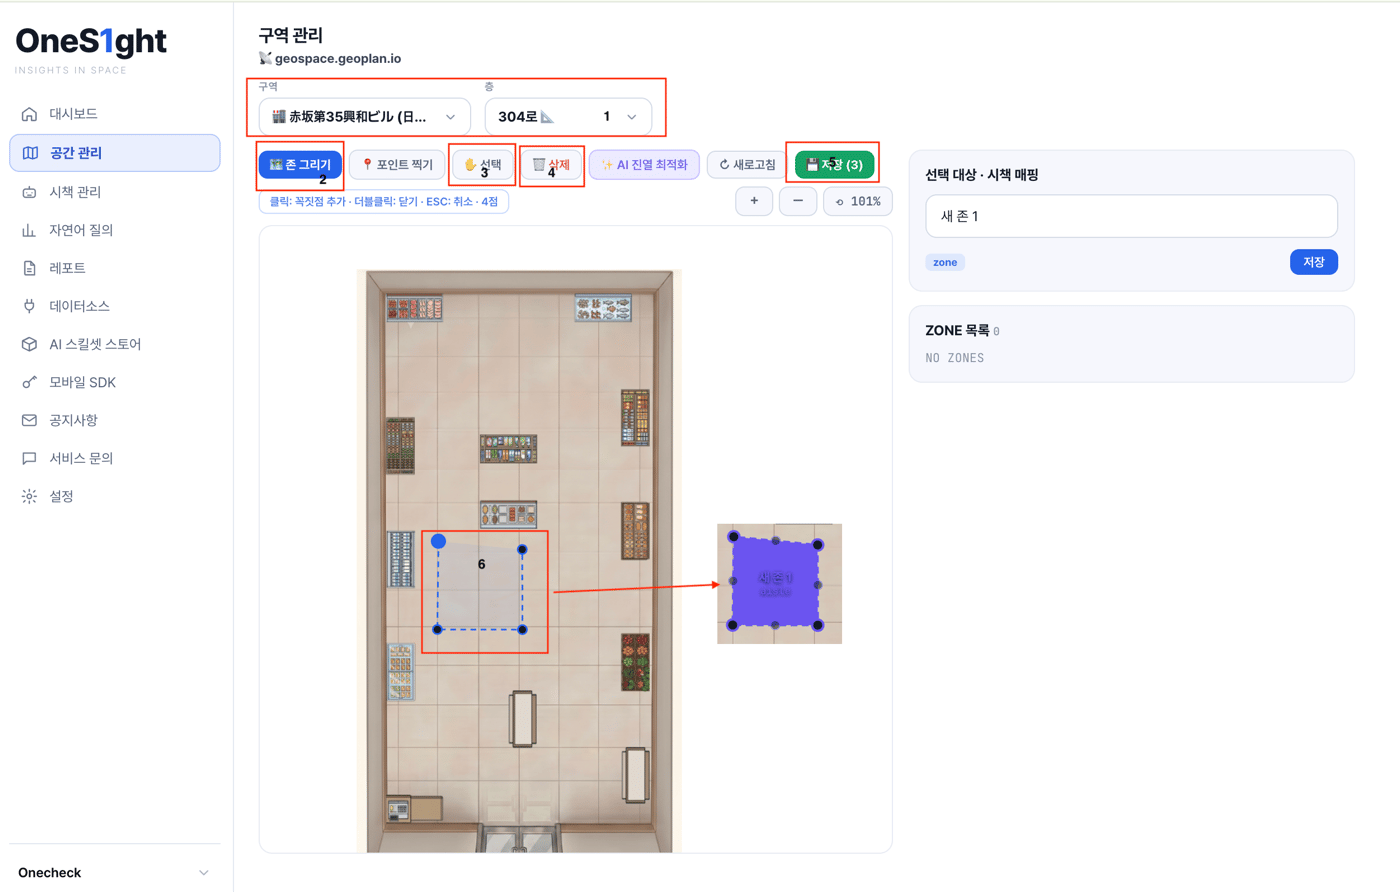 On floors with no zones, the demo app **polls for zone registration once per second** — whichever method
you use, the zone appears on the app's map within a few seconds. Try creating one live during the demo.
***
## 4. Build the demo app
### What you need
| Item | Notes |
| ------------------------------------ | ------------------------------------------------------------- |
| Mac + **Xcode 27 (beta)** | Install from developer.apple.com — the iOS 27 SDK is required |
| **iPhone 12 or later** (UWB-capable) | **iOS 27 or later** required |
| **USB cable** | Installing on a device is done over a cable connection only |
| Three keys | See step 1 — provided by your contact |
### 4-1. Clone the repository
```bash theme={null}
git clone https://github.com/onecheck-inc/oneSight2.0-SDK-DEMO.git
cd oneSight2.0-SDK-DEMO
```
### 4-2. Create the key file
If you received a `secrets.sqlite` file, simply copy it to the following location:
```
oneS1ghtSdk/App/Resources/secrets.sqlite
```
If you received only the key **values**, run the command below from the repository folder,
replacing each `<…>` with your key. (Uses `sqlite3`, built into macOS — no installation needed.)
```bash theme={null}
sqlite3 oneS1ghtSdk/App/Resources/secrets.sqlite \
"CREATE TABLE config (key TEXT PRIMARY KEY, value TEXT); \
INSERT INTO config VALUES ('sdk_key',''); \
INSERT INTO config VALUES ('geospace_key',''); \
INSERT INTO config VALUES ('partner_key','');"
```
Never commit the keys you received to a repository or post them in a public channel.
### 4-3. Open in Xcode
```bash theme={null}
open oneS1ghtSdk.xcodeproj
```
**If you have iOS development experience, you can skip 4-4 and 4-5** — they cover the usual signing and
device setup. (In short: sign with a Personal Team, and enable Developer Mode on the device.)
### 4-4. Set up signing (first time only)
**Add your Apple ID to Xcode** — no paid developer membership required; your everyday Apple ID works.
**Xcode → Settings…** (`Cmd+,`) → **Accounts** tab → **+** at the bottom left →
sign in with your **Apple ID** (a two-factor code will arrive on your iPhone)
Click the blue project icon (**oneS1ghtSdk**) at the top of the file list → **TARGETS → oneS1ghtSdk** →
**Signing & Capabilities** tab → select your account under **Team** (`Your Name (Personal Team)`)
If you see *"Bundle identifier is not available"*, append any characters to the **Bundle Identifier**
(for example `…demo` → `…demo2`). The error disappears once it's unique.
### 4-5. Prepare your iPhone (first time only)
Connect your iPhone by cable → tap **Trust** on the "Trust This Computer?" prompt and enter your passcode
On your iPhone: **Settings → Privacy & Security → Developer Mode** → turn on → **restart**
Note: the "Developer Mode" entry appears only after connecting the iPhone to a Mac once.
Without Developer Mode enabled, Xcode shows the device as unavailable and cannot run the app.
### 4-6. Run
1. Select **your iPhone** in the device picker at the top of Xcode (not a simulator)
2. Press **▶ Run** (`Cmd+R`) — the first build may take a few minutes
3. If blocked by "Untrusted Developer": on your iPhone go to **Settings → General → VPN & Device Management → Developer App → Trust**, then run again
Free-account signing **expires after 7 days**. When it does, connect the cable and run again to reinstall.
***
## 5. Try it out
1. Launch the app → **allow all** permission requests (location, nearby interaction)
2. Select a **building / floor** at the top → the plan loads. This list shows buildings and floors
**registered through [positioning infrastructure (GeoSpace)](/en/geospace/spaces)**. The entries below are
examples currently registered in the demo environment.
(Default selection follows the system language: Korean → Geumjeong Station skv1 · Room 607 / Japanese → Akasaka 35 Kowa Building · 304)
3. Once the status reads **Ready**, tap **\[Find my location]**
4. The **red dot** on the plan is your real-time location
5. **Walk into** a blue area (zone) — it turns red, and if an event is queued on the server a **coupon popup** appears
**Coupon events are queued on the server by your contact during the demo.** While you are inside a zone,
the app checks the server once per second and shows the event as a popup immediately (one coupon per session).
If no coupon appears after entering a zone, ask your contact whether the event was queued.
### What it looks like when working
On floors with no zones, the demo app **polls for zone registration once per second** — whichever method
you use, the zone appears on the app's map within a few seconds. Try creating one live during the demo.
***
## 4. Build the demo app
### What you need
| Item | Notes |
| ------------------------------------ | ------------------------------------------------------------- |
| Mac + **Xcode 27 (beta)** | Install from developer.apple.com — the iOS 27 SDK is required |
| **iPhone 12 or later** (UWB-capable) | **iOS 27 or later** required |
| **USB cable** | Installing on a device is done over a cable connection only |
| Three keys | See step 1 — provided by your contact |
### 4-1. Clone the repository
```bash theme={null}
git clone https://github.com/onecheck-inc/oneSight2.0-SDK-DEMO.git
cd oneSight2.0-SDK-DEMO
```
### 4-2. Create the key file
If you received a `secrets.sqlite` file, simply copy it to the following location:
```
oneS1ghtSdk/App/Resources/secrets.sqlite
```
If you received only the key **values**, run the command below from the repository folder,
replacing each `<…>` with your key. (Uses `sqlite3`, built into macOS — no installation needed.)
```bash theme={null}
sqlite3 oneS1ghtSdk/App/Resources/secrets.sqlite \
"CREATE TABLE config (key TEXT PRIMARY KEY, value TEXT); \
INSERT INTO config VALUES ('sdk_key',''); \
INSERT INTO config VALUES ('geospace_key',''); \
INSERT INTO config VALUES ('partner_key','');"
```
Never commit the keys you received to a repository or post them in a public channel.
### 4-3. Open in Xcode
```bash theme={null}
open oneS1ghtSdk.xcodeproj
```
**If you have iOS development experience, you can skip 4-4 and 4-5** — they cover the usual signing and
device setup. (In short: sign with a Personal Team, and enable Developer Mode on the device.)
### 4-4. Set up signing (first time only)
**Add your Apple ID to Xcode** — no paid developer membership required; your everyday Apple ID works.
**Xcode → Settings…** (`Cmd+,`) → **Accounts** tab → **+** at the bottom left →
sign in with your **Apple ID** (a two-factor code will arrive on your iPhone)
Click the blue project icon (**oneS1ghtSdk**) at the top of the file list → **TARGETS → oneS1ghtSdk** →
**Signing & Capabilities** tab → select your account under **Team** (`Your Name (Personal Team)`)
If you see *"Bundle identifier is not available"*, append any characters to the **Bundle Identifier**
(for example `…demo` → `…demo2`). The error disappears once it's unique.
### 4-5. Prepare your iPhone (first time only)
Connect your iPhone by cable → tap **Trust** on the "Trust This Computer?" prompt and enter your passcode
On your iPhone: **Settings → Privacy & Security → Developer Mode** → turn on → **restart**
Note: the "Developer Mode" entry appears only after connecting the iPhone to a Mac once.
Without Developer Mode enabled, Xcode shows the device as unavailable and cannot run the app.
### 4-6. Run
1. Select **your iPhone** in the device picker at the top of Xcode (not a simulator)
2. Press **▶ Run** (`Cmd+R`) — the first build may take a few minutes
3. If blocked by "Untrusted Developer": on your iPhone go to **Settings → General → VPN & Device Management → Developer App → Trust**, then run again
Free-account signing **expires after 7 days**. When it does, connect the cable and run again to reinstall.
***
## 5. Try it out
1. Launch the app → **allow all** permission requests (location, nearby interaction)
2. Select a **building / floor** at the top → the plan loads. This list shows buildings and floors
**registered through [positioning infrastructure (GeoSpace)](/en/geospace/spaces)**. The entries below are
examples currently registered in the demo environment.
(Default selection follows the system language: Korean → Geumjeong Station skv1 · Room 607 / Japanese → Akasaka 35 Kowa Building · 304)
3. Once the status reads **Ready**, tap **\[Find my location]**
4. The **red dot** on the plan is your real-time location
5. **Walk into** a blue area (zone) — it turns red, and if an event is queued on the server a **coupon popup** appears
**Coupon events are queued on the server by your contact during the demo.** While you are inside a zone,
the app checks the server once per second and shows the event as a popup immediately (one coupon per session).
If no coupon appears after entering a zone, ask your contact whether the event was queued.
### What it looks like when working
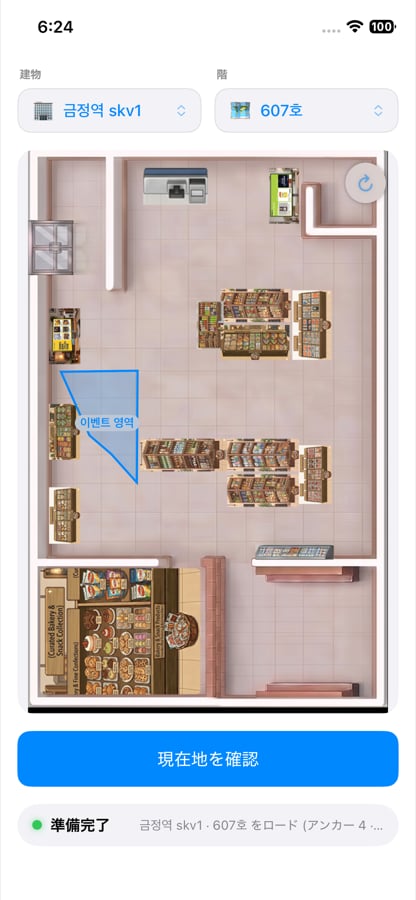
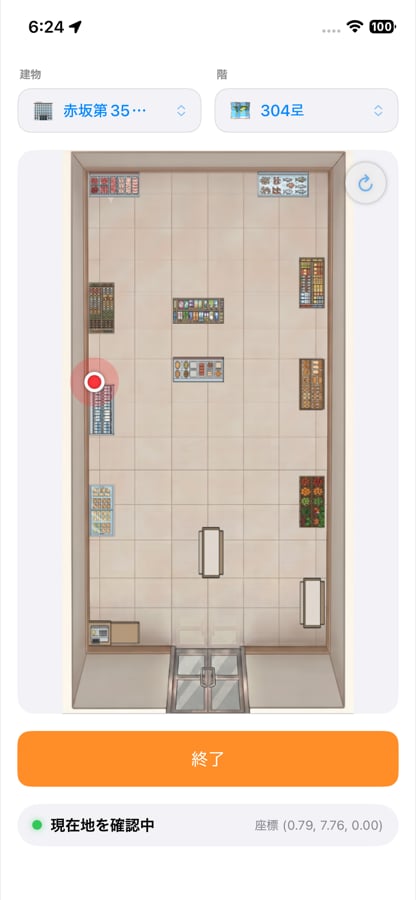 The app UI follows your system language — the screenshots above are from a device set to Japanese.
On floors without anchors, you can view the plan but the start button is disabled ("Positioning isn't available on this floor") — this is expected.
### Screen and features
| Feature | Description |
| ----------------------- | ---------------------------------------------------------------------------------------------------------------------------------------------------------------------------------------------- |
| **Building** | Korea: Geumjeong Station skv1 / Japan: Akasaka 35 Kowa Building — both sites have anchors installed and support positioning |
| **Floor** | = a **space** — one building can contain several spaces (each with its own plan, anchors, and areas) |
| **Red dot** | Your real-time position — appears when you start, follows you as you move, and disappears when you stop |
| **Area (zone)** | A zone created in the console — shown as a blue polygon, turning red when you enter |
| **↻ Refresh** | Reflects zone changes and deletions on the map. Zone polling stops once the first zone appears, so **use this button for any changes after that** (including zones added by running an action) |
| **Start / Stop button** | Start (Find my location) · Stop (Stop locating) — disabled on floors where positioning is unavailable |
| **Status bar** | Ready · Locating (with coordinates) · Positioning unavailable |
Switching buildings or floors reloads the plan and settings — this **can take a few seconds** depending on
server response, so please wait while the loading indicator is shown.
## Troubleshooting
| Symptom | What to do |
| ------------------------------------ | -------------------------------------------------------------------------------------------------------------- |
| Status shows **"Connection failed"** | Confirm `secrets.sqlite` is in the location from 4-2, then rebuild |
| No red dot after starting | Check that anchors are powered on for that floor — a diagnostic log appears after a few seconds |
| No coupon after entering a zone | Ask your contact whether the event was queued; if you already received one, this is expected (one per session) |
| App won't install (signing error) | Recheck 4-4 (Team selection + bundle ID change) |
| Device shows as unavailable | Enable Developer Mode and restart, per 4-5 |
| App won't open after 7 days | Connect the cable and run again (free signing expired) |
## Languages
The app follows your system language: **English · 한국어 · 日本語** (other languages fall back to Korean)
**To demo in another language** — change it in **Settings → General → Language & Region → iPhone Language**
on your iPhone, then relaunch the app. Setting Japanese also makes the Japan site (Akasaka) the default building.
The iPhone language applies to **the entire device** — remember to switch it back after the demo.
***
## Next steps
Once you've seen the flow in the demo, integrate the SDK into your own app.
Edit event areas on the floor plan.
The app UI follows your system language — the screenshots above are from a device set to Japanese.
On floors without anchors, you can view the plan but the start button is disabled ("Positioning isn't available on this floor") — this is expected.
### Screen and features
| Feature | Description |
| ----------------------- | ---------------------------------------------------------------------------------------------------------------------------------------------------------------------------------------------- |
| **Building** | Korea: Geumjeong Station skv1 / Japan: Akasaka 35 Kowa Building — both sites have anchors installed and support positioning |
| **Floor** | = a **space** — one building can contain several spaces (each with its own plan, anchors, and areas) |
| **Red dot** | Your real-time position — appears when you start, follows you as you move, and disappears when you stop |
| **Area (zone)** | A zone created in the console — shown as a blue polygon, turning red when you enter |
| **↻ Refresh** | Reflects zone changes and deletions on the map. Zone polling stops once the first zone appears, so **use this button for any changes after that** (including zones added by running an action) |
| **Start / Stop button** | Start (Find my location) · Stop (Stop locating) — disabled on floors where positioning is unavailable |
| **Status bar** | Ready · Locating (with coordinates) · Positioning unavailable |
Switching buildings or floors reloads the plan and settings — this **can take a few seconds** depending on
server response, so please wait while the loading indicator is shown.
## Troubleshooting
| Symptom | What to do |
| ------------------------------------ | -------------------------------------------------------------------------------------------------------------- |
| Status shows **"Connection failed"** | Confirm `secrets.sqlite` is in the location from 4-2, then rebuild |
| No red dot after starting | Check that anchors are powered on for that floor — a diagnostic log appears after a few seconds |
| No coupon after entering a zone | Ask your contact whether the event was queued; if you already received one, this is expected (one per session) |
| App won't install (signing error) | Recheck 4-4 (Team selection + bundle ID change) |
| Device shows as unavailable | Enable Developer Mode and restart, per 4-5 |
| App won't open after 7 days | Connect the cable and run again (free signing expired) |
## Languages
The app follows your system language: **English · 한국어 · 日本語** (other languages fall back to Korean)
**To demo in another language** — change it in **Settings → General → Language & Region → iPhone Language**
on your iPhone, then relaunch the app. Setting Japanese also makes the Japan site (Akasaka) the default building.
The iPhone language applies to **the entire device** — remember to switch it back after the demo.
***
## Next steps
Once you've seen the flow in the demo, integrate the SDK into your own app.
Edit event areas on the floor plan.